So, I have this '83 Suzuki GS1100GL, the king of the old-school, shaft-drive, heavyweight UJMs. It's a great bike, but it has one flaw (besides the flaky rectifier/regulator): it's carbureted. I've had three sets of carbs on this bike and all three have had fatal flaws. The first set had cracked/leaking fuel tubes (between the carbs), broken float towers and various other issues. The second set was in almost identical shape. The third set is a newer set of BS36SS carbs from a GS1150 and the bike runs great with them, but fouls out a set of plugs after just a few hours due to emulsion tube needle seats getting worn in to an egg shape instead of being round, which causes too much fuel to get in at idle and low-RPM conditions, fouling out plugs like crazy. This isn't conducive to reliability, which is something I want from a motorcycle. I started to look around for other options besides carbs, which means EFI.
A couple of guys on IRC suggested that I should look in to the Megasquirt ECU. I found the MS EFI and MS Runs forums, which had lots of info on Megasquirt usage in general along with success stories by people that had got their bikes going with a Megasquirt setup. That's when I started to think this whole crazy idea could work.
This page exists to document my little project: costs, the decisions I made, the mistakes I'll invariably make and the results I find along the way. Hopefully I won't screw up too bad.
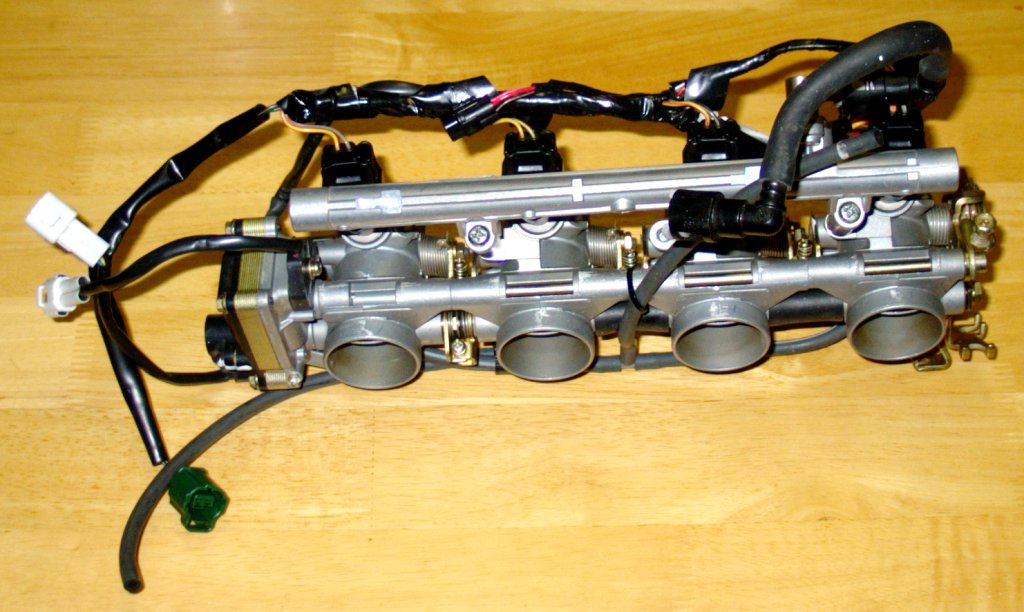
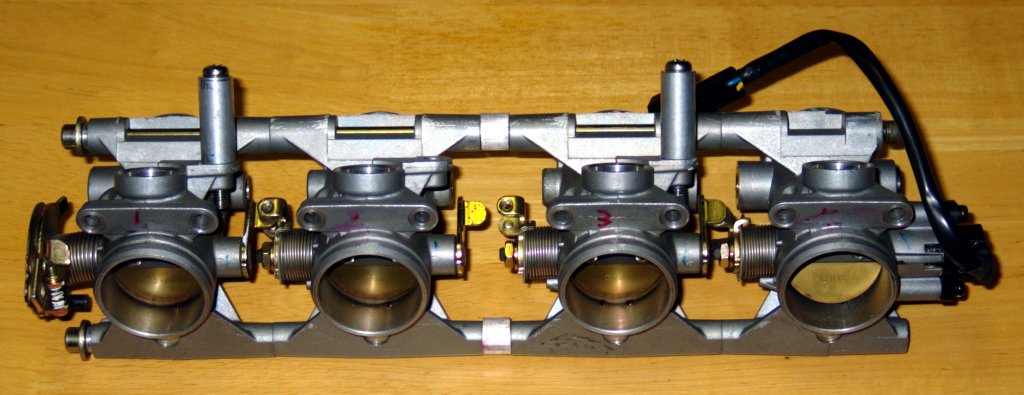
I decided to use '01-'03 GSXR 600 throttle bodies. They're a bit larger in diameter than the BS36 carbs on the intake side (the side that sticks in to the boots on the heads) and are spaced a bit differently, but the throttle bodies are also separate units. This means it'll be easier to alter spacing between the throttle bodies if I need to.
2007-10-21: I was high-bidder on a set of the throttle bodies I wanted as well as a wiring harness from a similar-year GSXR 750. This gets me the throttle bodies with injectors, plus (hopefully) pigtails for all the wiring I need. I'm not quite sure if the wiring harness will be useful yet, but we'll see.
Turns out the eBay seller works for Greg Bates Automotive in Tuscola, IL. They do custom work, including fuel injector and fuel rail work. After talking with Bill, the guy that was selling the throttle bodies, it sounds like they'd be willing to do the machining and welding on the fuel rail.
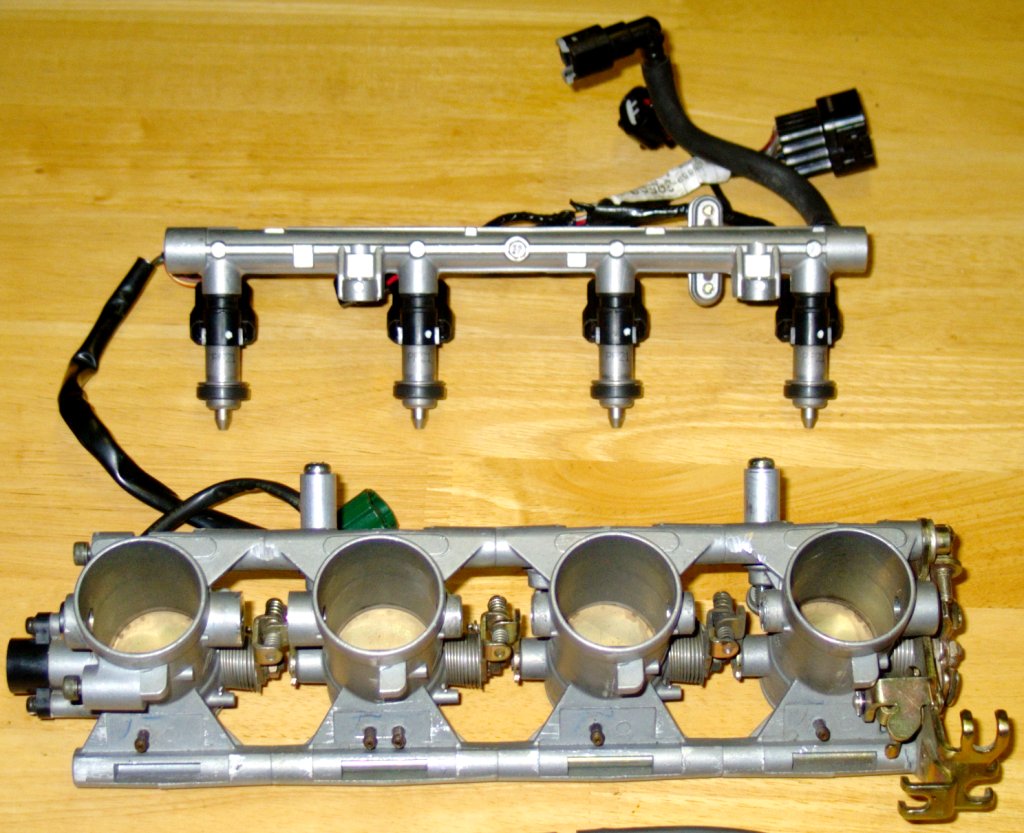
2007-10-22: Picked up the throttle bodies from the eBay retailer. He works in Tuscola. It probably cost me about the same for gas as it would to ship the throttle bodies, but picking them up got them here faster. Separated the fuel rail and injectors from the throttle bodies, removed the secondary set of computer-controlled butterflies and started working on the spacing problem. I managed to burn a hole in one of the MAP vacuum lines while cutting out the computer-controlled butterflies. Dumb move on my part.
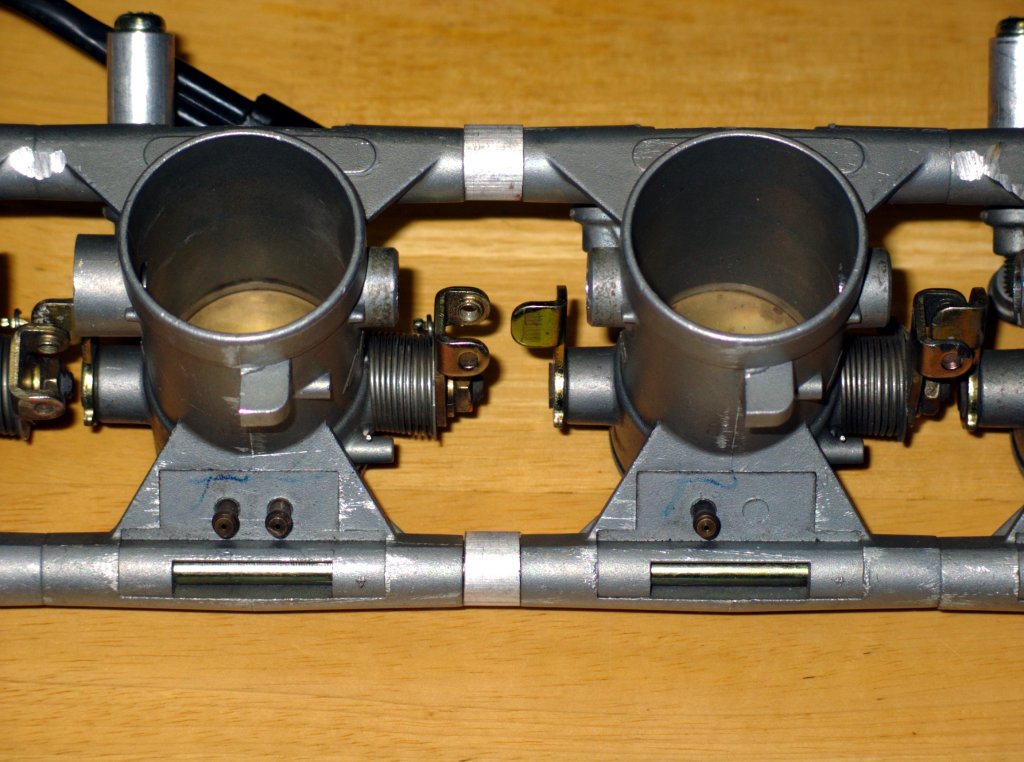
Carbs that fit the bike have a center-to-center spacing of 77-93-77 in mm. The GSXR 600 throttle bodies I have are 80-80-80. The throttle bodies also have a slightly bigger intake side than the original carbs, which means they'll be a tighter fit in the intake boots. After looking over the throttle bodies for a while it looks like it will be easier to maintain the 80mm spacing between the two "pairs" of throttle bodies. Trying to take 3mm out from between the throttle bodies will be annoying; I'd have to machine down the housings themselves, plus adjust the linkages between the throttle bodies...Doable, but annoying. Since the center-to-center difference between the pairs of throttle bodies is only 3mm, I'm guessing that the intake boots will have enough give to let the 80mm-spaced throttle bodies fit on to the 77mm-spaced intake ports. That would lead to a total offset of the inner throttle bodies 1.5mm towards the center of the engine. Since the spacing between the center two intake ports is 93mm, adding 10mm to the center spacing of the throttle bodies will net me 90mm spacing, which will account for the 1.5mm-closer throttle-body spacing on both sides. So, I'm guessing I'll need to add 10mm between the center throttle bodies.
2007-10-24: Stuck a throttle body in an intake boot. It's a tight fit, but the throttle body does fit in the intake boot. Yay. I may have to "massage" the boots once I get the entire rack of throttle bodies spaced out for testing, but hopefully not.
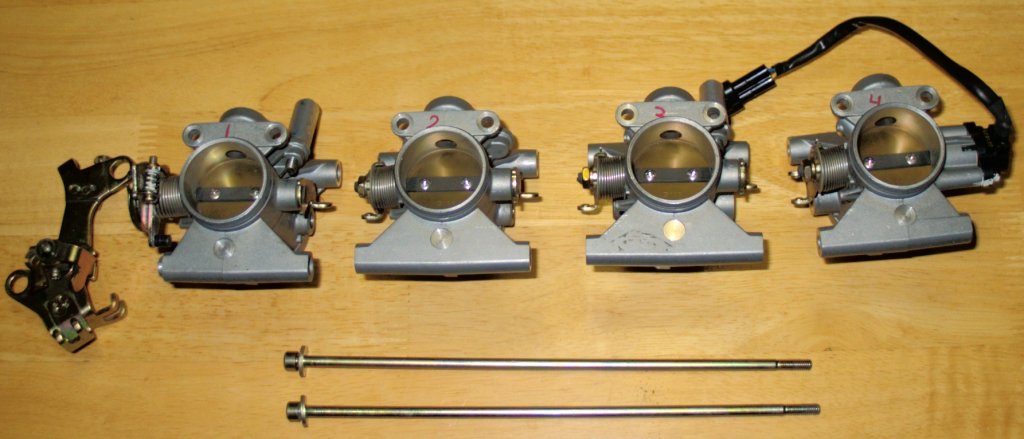
2007-10-25: Finally got up the nerve to separate the individual throttle bodies. Took the screw/spring adjusters out, then pulled the two socket-head cap screws out. The throttle bracket came off with the bolts. That's all it takes to get the individual throttle bodies apart.
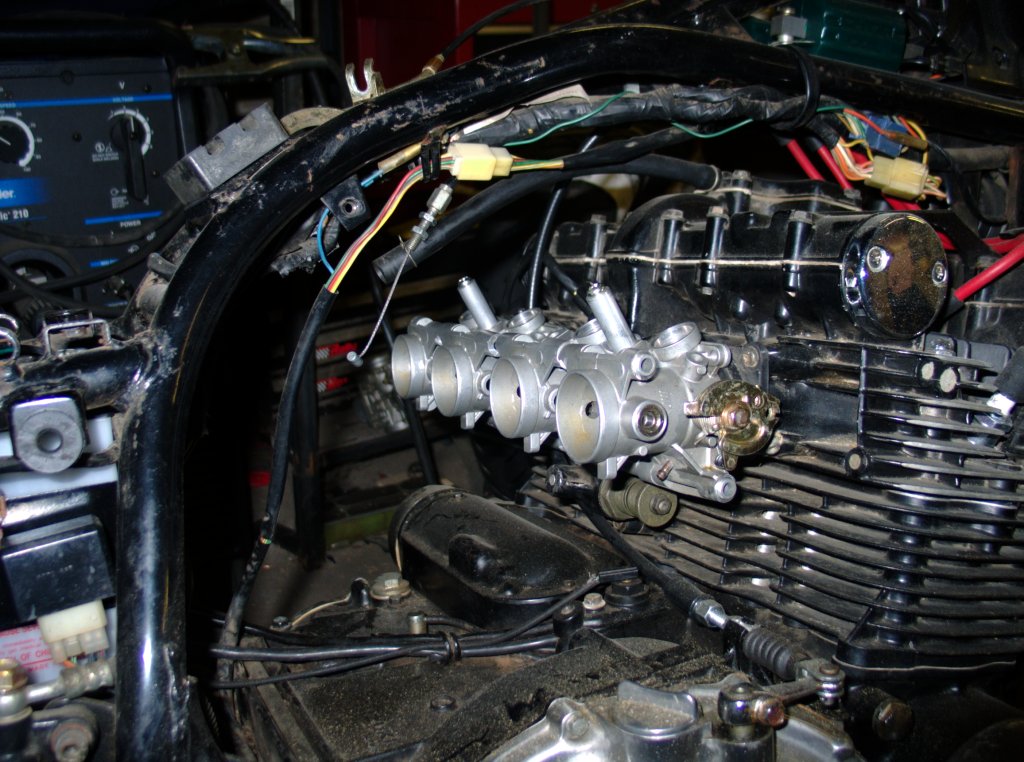
I decided the best way to check how much more distance there will need to be between the two center throttle bodies would be to stab all four of them on the engine, get the bolts back in (if possible) and just measure the gap, so that's exactly what I did. I was able to get all four throttle bodies mounted on the engine without too much trouble, so I think we'll be good to go with leaving the 80mm spacing alone on the outer TBs. Next, I stabbed the long socket-head cap screws that hold all the throttle bodies together back in and measured the gap. Surprisingly, it came out to just a hair's width more than ten millimeters. Maybe I'm not crazy after all.
I pulled the top cap screw out and started stacking washers between the center throttle bodies and reinstalled the top cap screw. I did this just to make the throttle bodies a solid assembly again, like they would be once I find or make a proper pair of spacers (one each for the top and bottom bolts). It looks ugly, but the rack can be installed and removed with the washers acting as spacers. This is encouraging. The only real remaining throttle-body issues are coming up with a fuel rail, extending the likages between the two center throttle bodies to compensate for the 10mm extra space, epoxying closed the holes left from the removal of the secondary butterflies and their motor and finding a new pair of socket-head cap screws to hold the throttle bodies together since the original cap screws are only engaging somewhere around three revolutions of thread in the outer throttle bodies.
USPS tried to deliver the wiring harness today but no one was home to sign for the package. I'll go pick it up tomorrow before I head in to work.
2007-10-26: Looks like the original socket-head cap screws are M6-1.0x250mm, cadmium-plated, partially-threaded, socket-head cap screws. I need new bolts that are as similar as I can get, but 10mm longer. These won't be fun to find. I may end up just using allthread and nuts/washers. This was determined by my friend Janusz and I while we were out shopping for aluminum pipe I could cut apart for spacers. Janusz also suggested that I just buy 1/2"-diameter (or so), round, aluminum rod, cut it to the length I want and drill through the center to make the spacers I need. I knew I bought a drill press for a reason. I'm going to check with Kurland Steel on Monday to see how much a hunk of aluminum will cost me.
I picked up the wiring harness from USPS this morning. It looks to be in reasonable shape and came with a few extras like a MAP sensor, a fuse block and a few other bits I haven't identified yet.
2007-10-28: No progress, but I fixed my horizontal band saw. It now cuts straight. This will make cutting spacers much easier.
2007-10-30: Bill had an outside micrometer. The aluminum tubing I need is almost exactly 0.552 inches, pretty close to 14mm or 9/16". I'm going to order aluminum rod and M6-1.0 threaded rod tomorrow.
2007-11-01: Of course, I couldn't get both items from the same place. The aluminum is coming from Kurland Steel and I had to buy twelve feet of it to get the small portion I'll need. The threaded rod is coming from Fastenal and I had to buy one meter of the threaded rod. There won't be too much of the threaded rod left. Of course, neither item was stocked locally, so hopefully they'll both show up tomorrow.
I may have the shop I bought the throttle bodies from machine and weld the fuel rail for me. I don't really have the right tools here to drill the rails properly, plus I don't have the facilities (gas, wire, etc.) to weld aluminum here. If I planned on doing this repeatedly I'd invest in the parts to set my welder up for aluminum, but it's not cost-effective right now.
2007-11-02: The aluminum stock for the spacers arrived today. It's not the same exact diameter as the throttle bodies, but you'd have to be looking closely to notice. I'll probably work on drilling through the center of the rod tonight or tomorrow, then get my spacers cut to the right length. The current plan is to get a block of wood, drill a hole in the wood to hold a hunk of the rod, then use that block of wood to hold the rod in place while I'm drilling. I'm going to drill through the center axis of a 2" (or so) hunk of the rod before I cut it in to spacers.
Fastenal said the M6-1.0 threaded rod won't be in till mid-week. Bummer, but I can still get my spacers cut and sorted out this weekend. I need to scare up some M6-1.0 nuts, too.
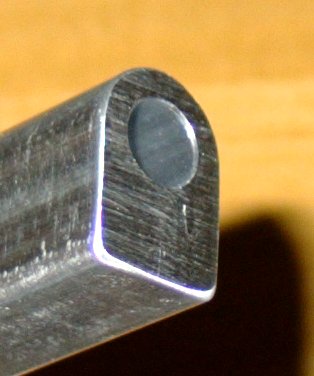
2007-11-04: Throttle-body spacers are done. I cut off about six inches of the round aluminum rod, then realized I didn't have a 9/16" drill bit to drill a hole in a block of wood to use as a holder for the aluminum, so I tooled up to Lowe's and got one. I drilled a hole in the hunk of 2x4 (originally oriented horizontally, but later oriented with the 2" sides vertical due to the aluminum spinning in the wood), then forced the aluminum rod in to the hole in the 2x4. It's a crude fixture, but it worked well enough. I used a 1/4" bit in the drill press and drilled about two inches in to the top of the aluminum rod, then noticed it was too far off-center. I had to flip the piece around and re-drill the hole. It's still slightly off-center, but you'd have to look hard to notice.
I had to cut off six spacers to get two that were right about the size I needed. Even with decent tools, that kind of precision isn't exactly trivial. I ended up having to drill in to the aluminum rod some more cause I had to cut the last two of six spacers to get two that were what I needed.
However, the finished product (close-up of the spacers) didn't come out too bad. The camera's flash makes them stand out a lot more than they actually do; you'd have to look hard to see that they're off-color and not exactly the same diameter as the sections of throttle body touching them.
My dad suggested just welding the nuts on to the threaded rod for the throttle-body bolts. This is a good idea and probably what I'll do.
2007-11-07: Ordered the fuel rail material tonight...Just the rail; I'm waiting to hear back from Bill (from Greg Bates Automotive) if the ends I picked out will be right. I ordered two feet of -6AN extruded-aluminum rail from Ross Machine Racing. The shipping was almost as much as the rail itself. Bill suggested weld-on -6AN ends and I found some for under $5 apiece from Pegasus Auto Racing, but I'm waiting to hear back from Bill about the ends' suitability before I order.
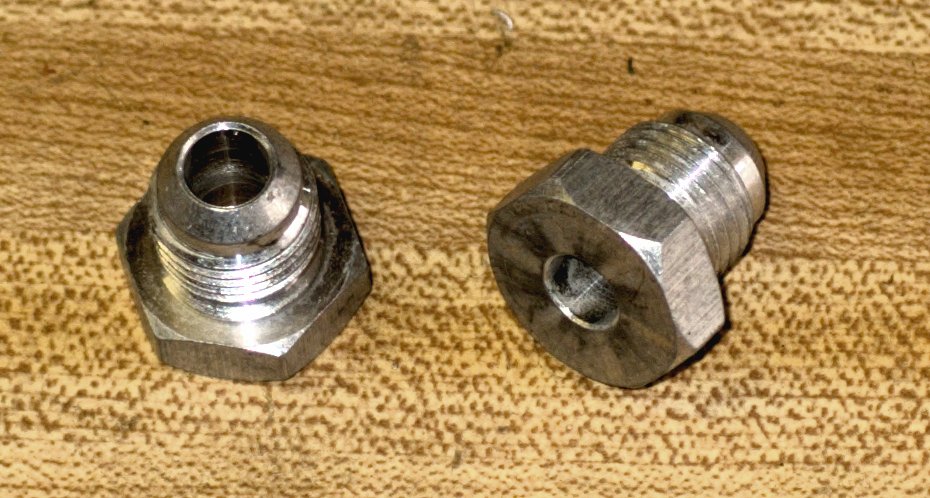
I've been thinking about the fuel and return lines to the tank. My current working idea is to make a plate that would bolt in place of the petcock. This plate will essentially just have two (#6AN male?) fittings on the bottom of the plate, mated to separate passages through the plate. Either fitting could be for the fuel or the return line, although it makes sense to use the port closest to the rear of the tank as the fuel line. This setup should prevent any air that may come back through the return line ending up in the fuel line. Later on I could add a pipe to the plate to allow the return fuel to exit high in the tank. A strainer could probably be fitted to the fuel line side inside the tank, too. To get all of this to fit, I may have to open up the hole in the tank a bit. The factory petcock opening only has to fit a strainer through; in my arrangement there may be a strainer and a return pipe.
2007-11-11: Frustration. The throttle-body assembly hasn't made it on to the engine as a complete unit. I guess I'll have to clearance the boots some...Or something. I'm not sure yet. The throttle-bodyes seem to be spaced close enough that I should be able to get them on as a unit, but it doesn't seem to be working well. I don't know if the boots aren't pliable or flexible enough.
After posting to The GS Resources's Forums asking about the difference between new boots and old boots, it sounds like new intake boots would be my easiest (albeit not the cheapest) option. Since I never expected this to be a very cost-efficient process, I suppose I'll order a new set of boots next paycheck. Even if the new intake boots don't flex enough right off the bat it seems like they'll still be a better starting point than the old intake boots on the bike now.
The threaded rod hasn't showed up at Fastenal yet. They're being amazingly slow. Not that it matters; if I still need to adjust throttle-body spacing I'd rather not cut the threaded rod until the spacing is sorted out. Same for the fuel rail...No point in having that cut and welded until the spacing is sorted out.
2007-11-12: Fuel rail (pics: 1, 2, 3 and 4) has arrived. It seems galled/scratched up on the flat "injector" face in spots. I suppose it won't affect functionality at all and no one will ever see it, but it hardly looks as good as I thought it would.
2007-11-14: It's been suggested that one of the Mikuni universal boots may work for my GS. I'm going to pull one of the factory boots off and take some measurements from it. I need to find out how far apart the screw openings are on the factory boot.
So, the intake boot for cylinder number one came off surprisingly easily. It looks like the center-to-center spacing of the bolt holes is 68mm. Weird. Mikuni generic boots seem to only have 70mm holes. I wonder if I can make one fit...It looks like the Mikuni I-VM36-200-1 flange would be about what I need as far as actually sticking the throttle-body on the engine goes and has 70mm center-to-center bolt holes, so maybe that part will work. I'm going to call BikeBandit tomorrow and see what they say. I have a post at The GS Resources with some similar questions in hopes that someone's done this before.
There's another Mikuni part that's similar in dimensions to the I-VM36-200-1, except that it has slotted bolt hole openings so you can have any center-to-center spacing from 70-75mm. The KHS-004 is also 3mm longer in the throat, so it may have a bit more flex, which will be nice when attempting to install the slightly-offset throttle bodies.
So, after a post by Billy Ricks at the GS Resources forums tipped me off that the boots were "sided," I started looking at how the boots were arranged. It looked like all four of the boots had a slight cant that pointed them towards the centerline of the motorcycle. So, I swapped the left-side and right-side outer boots. That way, the outer boots cant away from the centerline of the motorcycle, while the inner boots continue to cant towards the motorcycle's centerline. After switching the boots around I can not get one "pair" of throttle bodies on the engine at any time...Both the left and right pairs fit in their opposite-side boots, respectively. This is cool. I think the cold and lack of oil is hurting the process, so tomorrow I'm going to try to get the entire assembled rack on as a unit with the help of a heat gun and some oil.
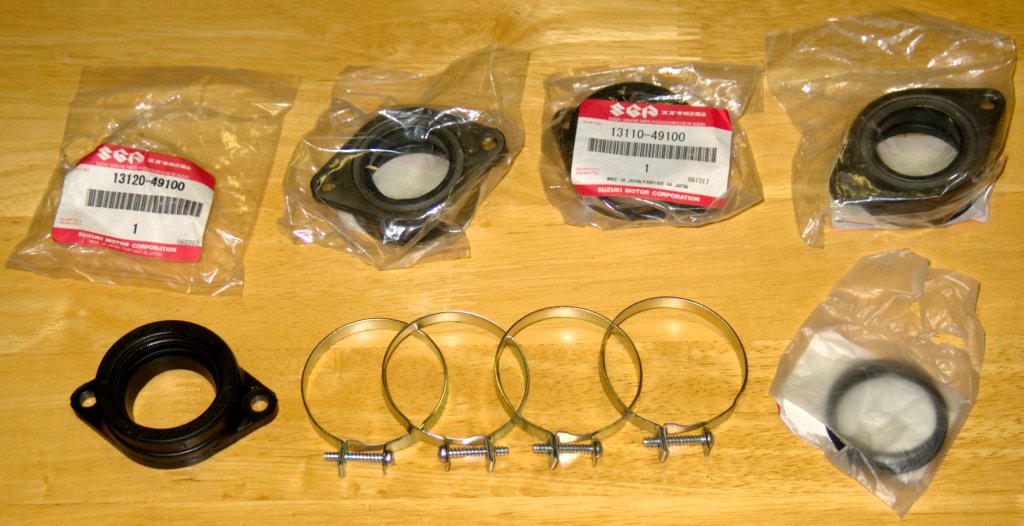
2007-11-17: Ordered new intake boots for the motorcycle today. The word in the forums is that new boots will be more flexible. Hopefully they're right. Ordered new O-rings and clamps, too. I just ordered the two 6AN male aluminum weld-on fittings from Pegasus. I still need to pick up fasteners to replace the Phillips screws that hold the intake boots on, but I can do that locally.
I have yet to try heating the intake boots before trying to get the throttle bodies on. Maybe I'll try that this weekend.
2007-11-22: Happy Thanksgiving. The #6 AN fittings showed up on Monday, but I'm still waiting for the intake boots to arrive. Sportland says they'll probably be here early next week. The passage through the fittings looks surprisingly small compared to the inside diameter of the fuel rail, but everyone says these fittings should work fine.
The intake boots are the hang-up now. Once they get here I can see about finally getting the throttle bodies on the bike. Once I know the throttle bodies will fit with their current spacing I can get the fuel rail made and finish up getting the center linkage sorted out. I'm thinking that sandwiching the "arms" of the linkage between two pieces of metal with another piece sandwiched out past the end over to the other side may work the best.
2007-11-26: $100 worth of intake boots, clamps and o-rings showed up today. The intake boots don't seem much softer than the ones that were on the bike. Hopefully the new boots have a bit more give than the old ones. It's unpleasantly cold out, so I'm not going to try installing the new boots tonight. Also, I don't have new mounting hardware yet, which I should get before I put the new boots on.
2007-11-27: The M6x1.0 steel threaded rod I ordered from Fastenal finally showed up. I ordered the rod in early November. Good thing this wasn't a time-critical job. I'm going to cut this rod up in to two sections of the length I need and then weld a nut on to one end of each section, making something that'll work as a bolt to hold the throttle bodies together. Of course, I'm not going to do this till the throttle-body spacing is set in stone.
2007-12-01: Picked up eight new M6-1.0x16 socket-head cap screws and a can of DuPont spray-on teflon silicone lubricant. I can ditch the phillips-head fasteners that hold the intake boots on. Hopefully the spray lube will help with getting the throttle bodies installed.
2007-12-09: The motorcycle gods hate me. I fought with trying to get the throttle bodies installed for about an hour and a half tonight. I first installed the intake boots with the outside ones swapped (right, left, right, left), but didn't have much luck getting the throttle bodies on that way. I then swapped the outer pair back to the way they are installed from the factory (left, left, right, right) and still couldn't muscle them on. I think the cold is working against me.
I may separate the throttle bodies, stuff them in the boots, then bolt the rack back together while they're on the bike and leave the throttle body assembly on there for a few days. I wonder if that will help anything. At this point it's worth a shot. Sounds like something to attempt tomorrow.
2008-01-10: Happy belated new year. One of my resolutions is to get this project working. So, I started working on it again after being somewhat frustrated at the throttle-body mounting situation.
I decided to try spacing out the outer pairs of throttle bodies a bit in hopes that the new intake boots will "take a set" or stretch in such a way that they'll be a bit more forgiving when I try to get the whole assembly on as a unit. So, between each of the outer pairs of throttle bodies I put two washers arond the bolts where the bolts pass through the throttle bodies. The two washers shove the throttle bodies apart approximately three millimeters, which is about double the distance they differ from the stock port spacing. Hopefully things will be spaced out better when I pull the throttle bodies off, bolt them back together and see if i can get the whole rack on as a unit.
If I can't, then it's time to try getting the boots nice and hot. Maybe they'll get more pliable when they're warm. If that doesn't work, then I'll have to see what else I can do to get the throttle bodies to fit.2008-04-27: My friend Paul suggested that I use studs and nuts in the cylinder head instead of bolts for the intake boots. That way I can put the intake boots on the throttle bodies, then try to get the whole assembly on the studs. The flanges should flex a bit more than the whole circumference of the throttle-body boots, so this may be worth a shot. I'm going to see about getting some studs this week.
I'm also going to see about getting some 6mm rod and cutting threads in the rod myself to use for the long bolts that hold the throttle bodies together as a unit. The allthread/nut idea would work all right if it held the throttle bodies in alignment, but the bolts did a better job and I need to get the same kind of tolerance.
2008-05-04: Tonight I figured out what studs should work for the intake boots. I cut off a hunk of M6-1.0 rod, stuck an intake boot on the engine, screwed one hole down with one of the existing socket-head cap screws and then just screwed the rod in to the other hole. I marked the rod, took it out, measured from the end to the mark and came up with a nice, round 20mm, or really close to it. I decided to go to the next-longer available stud, which conveniently worked out to be 25mm. So, I placed an order with McMaster-Carr for 10x 93805A320 (18-8 stainless-steel, M6-1.0 studs for $8.20) and 1x 90710A038 (box of 100 18-8 stainless-steel M6-1.0, 3.2mm thick nuts for $7.93). There should be enough room to get a nut on to the stud once the intake boots are seated with the throttle bodies mounted, but I opted for the thinner nuts just in case. Hopefully this all fits right.
2008-05-07: Studs and nuts showed up. I probably won't try to make things fit until I get some spare time, which won't happen till after this weekend.
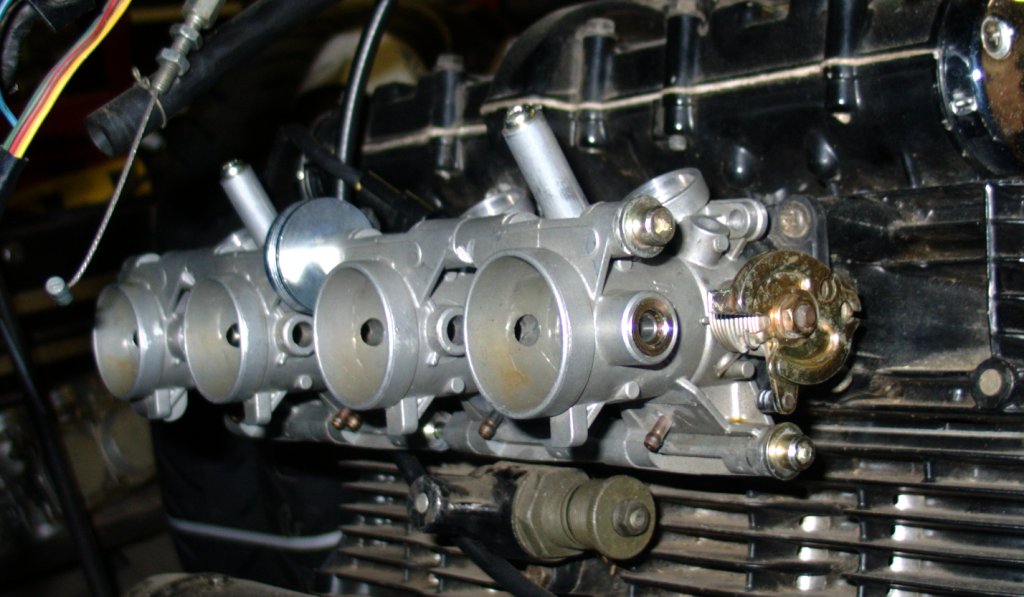
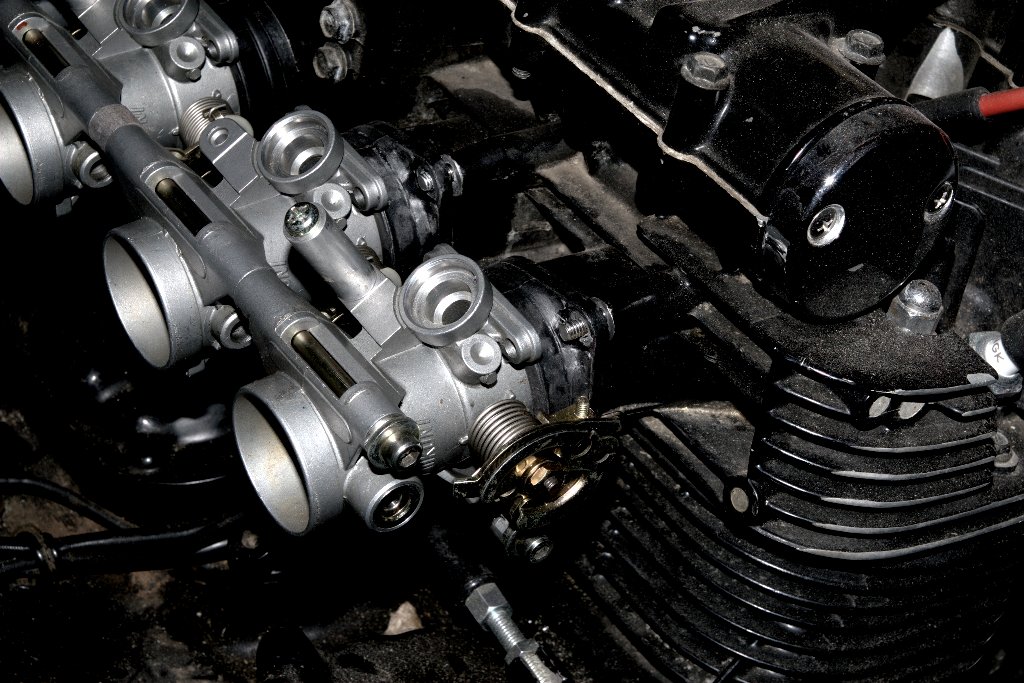
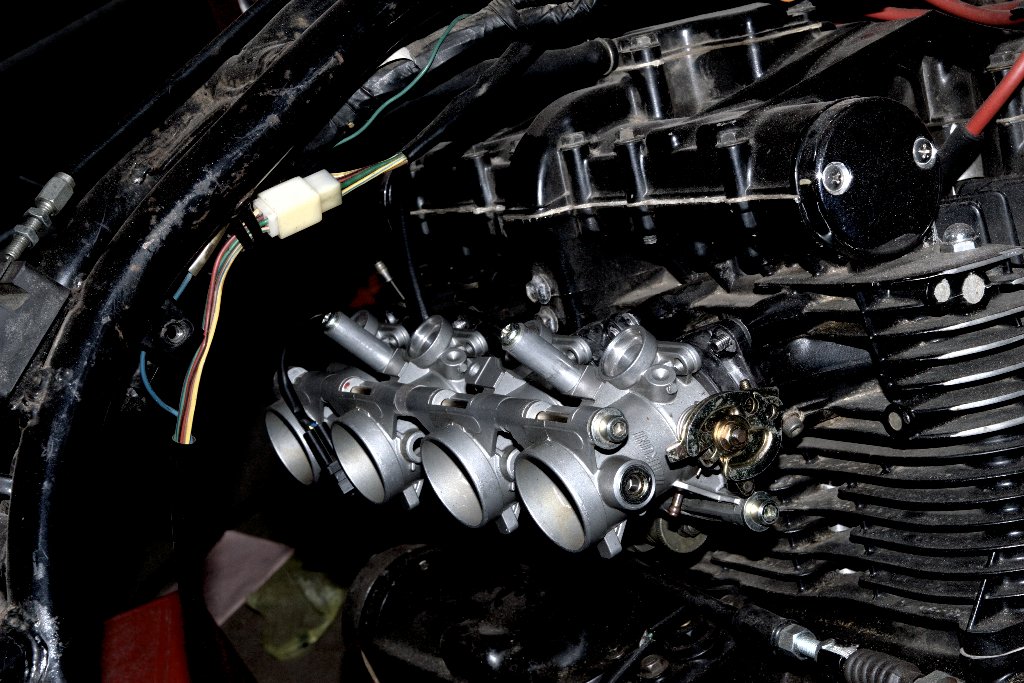
2008-05-12: The studs did the trick! The throttle bodies actually fit on the engine (1, 2) without too much of a fight! Once the studs were in the head it just took a bit of playing to get the holes in the boots lined up, but after that everything went on without much more than a bit of jostling around. This is great...One of the bigger hurdles is out of the way.
Over the next few days I'll pull the studs back out, throw some anti-seize on the threads and screw them back in, hopefully for good. Why am I not using Loc-Tite? I'd have to use red Loc-Tite and I'm really not thrilled at keeping the studs in the head that permanently.
I think I'm going to make another set of spacers for the throttle bodies. The ones I made on the band saw are not all that level. I'm hoping I can do a better job with new ones.
Next up is the center linkage spacing issue and getting the fuel rail made. I'm not worried much about the fuel rail; I'll just dump the throttle bodies, injectors, rail and fittings off with Bill (from Greg Bates Automotive) to have the rail machined for the injectors and the fittings welded on the ends. For the linkage I think I can just weld up some bits of scrap steel to extend the linkage I have now across the gap to the other side. I'll probably tackle the linkage and spacers first, then get ahold of Bill to do the fuel-rail work.
2009-05-10: Yes, I know it's been nearly a year since I've updated this page. Things will hopefully be moving forward a bit more. There has been a little progress.
I found bolts! Actually, my mom put me in touch with a place that sells fasteners and that company (Fasteners, Etc.) found bolts: M6-1.0x255mm, partially-threaded, socket-head cap screws. They're not exactly what I want; the bolts are 5mm shorter than I'd like and plain steel---which means they'll rust---but I'm just downright sick and tired of looking for fasteners, so I believe these will work. The downside: they were $31.25 each. Ouch. By the way, the part number is M06155010SCP. I need to actually count how many revolutions of threads are engaged in the throttle bodies once everything's put together to make sure I'm comfortable with things.
Spacers: a friend of mine, Alex, has a lathe and a mill. He said he'd be able to help me get some nice spacers made from the aluminum rod I have, which would be a lot better than the hack-job pieces I've been using up till this point.
Oh, and I can't find the throttle cable bracket that bolts to the throttle end of the throttle bodies. This annoys me.
2009-05-27: I have awesome spacers. Alex came through for me and earlier this evening he machined the spacers for the throttle bodies. They came out awesomely. I'll get pics when it's light out and I'm actually in town.
I still can't find the throttle-cable bracket that goes on the right-hand throttle body. This bothers me.
Costs are here for interest only. The numbers often come from receipts, but sometimes there's no tax break-out for each item and I'm too lazy to calculate the tax myself. I'll include the cost for tax and shipping when I have it.
I'm keeping track of tools separately since others may not need to purchase the tools for this project. I am not including costs for tools I already own.
| Part, item or service | Source (vendor or retailer) | Cost | Date purchased | Notes |
|---|---|---|---|---|
| Materials, parts and services | ||||
| 2001-2003 GSXR 600 throttle bodies | eBay | $51.00 | 2007-10-21 | Got lucky; the eBay seller was local. No shipping. |
| 2000-2003 GSXR 750 main wiring harness | eBay | 87.00 ($75.00 + $12.00 shipping and insurance) | 2007-10-21 | Came with some extras like a MAP sensor, etc. Not sure what will be useful from this wiring harness yet. I picked it up so I would have pigtails for all the injector wiring instead of having to hunt them down individually. |
| 12' of 9/16" round 6061 aluminum stock | Kurland Steel | 13.29 | 2007-11-02 | I should need less than an inch of this metal, but Kurland would only sell me a 12' section. Good thing it wasn't expensive. Ordered on 2007-11-01; they delivered for free. |
| M6-1.0 hex nuts, grade 8, pack of five | Lowe's | 0.73 ($0.68 + $0.05 sales tax) | 2007-11-03 | Nuts for the M6-1.0 rod to be used to hold the throttle bodies together. I'll use two. |
| 2' -6AN extruded-aluminum fuel rail | Ross Machine Racing | 35.46 ($20.00 + $15.46 for shipping/handling) | 2007-11-07 | Fuel rail. Had to buy two feet; I'll most likely only need one foot. Should be plenty big enough for this bike's needs. |
| Intake boots, O-rings and clamps | Sportland Motorsports | 98.79 ($91.68 + $7.11 tax) | 2007-11-17 | Taking a gamble...Hopefully the throttle bodies fit more easily with new boots. Suzuki P/N 13110-49100 x2, 13120-49100 x2, 09280-40010 x4 and 09402-54303 x4. |
| 2x 6AN male aluminum weld-on fittings | Pegasus Auto Racing | 15.95 (2x $4.59 + $6.77 shipping/handling) | 2007-11-17 | Needed for the ends of the fuel rail. |
| M6x1.0 threaded rod, steel, one meter long | Fastenal | 3.24 ($3.01 + $0.23 tax) | 2007-11-27 | Need this for holding the rack of throttle bodies together. Gonna cut two pieces to replace the bolts and weld a nut on to one end of each new bolt. |
| 8x M6-1.0x16 socket-head cap screws | Lowe's | 7.46 (4x $1.73 + $0.54 tax) | 2007-12-01 | Fasteners to hold on the intake boots. Bike originally had phillips-head fasteners and those just won't do. I ended up not using these fasteners, instead going with the studs/nuts in the following row. |
| 10x 93805A320 (18-8 stainless-steel, M6-1.0 studs for $8.20) and 1x 90710A038 (box of 100 18-8 stainless-steel M6-1.0, 3.2mm thick nuts for $7.93) | McMaster-Carr | 22.34 ($16.13 + $1.21 tax + $5.00 shipping) | 2008-05-04 | Switched to studs and nuts to mount the throttle bodies instead of socket-head cap screws. This actually worked. Yay. |
| 2x M06155010SCP M6-1.0, 255mm, partially-threaded, plain-steel, socket-head cap screws | Fasteners, Etc. | 67.34 (2x $31.25 + $4.85 tax) | 2009-05-11 | Bolts to hold the throttle body assemblies together. They're plain-finish (yuck), but they should work. Ironically, this part number was created for this order and I wouldn't be surprised if no one else ever uses it again. |
| Total cost for materials and parts | 402.50 | |||
| Tools | ||||
| Hitachi "Black Shield" 9/16" drill bit with 1/2" shank | Lowe's | 16.05 ($14.93 + $1.12 sales tax) | 2007-11-03 | Needed this to drill a blind hole in a block of wood. I used this block of wood to hold the 9/16" round aluminum rod vertical so I could drill holes in it. I cut the aluminum rod in to spacers for the throttle bodies. |
| DuPont aerosol-spray teflon silicone lubricant | Lowe's | 4.30 ($3.99 + $0.30 tax) | 2007-12-01 | Hopefully this stuff helps get the throttle bodies on. I was originally looking for a tub of rubber or silicone grease, but no one in town had any. |
| Total cost for tools | 20.35 | |||
| Total cost | 422.85 | |||
Page created 20071017 01:15 CDT.
Comments? Suggestions? Hate mail? Send them to hemi@puresimplicity.net.