I had a '67 Plymouth Valiant Signet project car that my wife, Amy, absolutely hated. "It's an ugly box, and it will always be ugly." She also noticed that I'd become pretty disenchanted with the Valiant project pretty much since the car got vandalized in storage shortly after I bought it. She kept asking about what I would build if I didn't have the Valiant, cause she's a smart person and realizes that I will always need to have something to work on, until finally I said that I would probably build a kit car. She wanted to know why, and I said, "cause there's much less parts-scrounging, much less rust and grime to deal with, and generally a set of instructions to follow." She persisted in trying to figure out which specific kit car I wanted. I've always wanted a Type 65 Coupe from Factory Five Racing cause I've always loved the styling and performance of the original Shelby Daytona Coupe. Since there were only six originals made and I don't care about being historically correct—I just want a fun driver—a kit car was really the only option, and Factory Five Racing sells some of the nicest reproduction kits out there. Amy asked a ton of questions about the kit, the price, the options I'd want, and kept talking to me about it off and on for a month or so.
Everything just kind of fell in to place around mid June of 2015; Factory Five was putting on their 20th-anniversary sale and was offering some wonderful deals. The one that really worked out well for this whole project was the 50/50 sale. During the 50/50 sale, any option listed on the kit order pages was 50% off. When I mentioned this to Amy, she said, "put your order in, but try to push the delivery date out as far as you can so you can move the Valiant on and re-organize the garage."
This page is here to document the build, including questions I have, solutions I come up with, and general ramblings. I'm starting from the day the order was placed.
2015-06-13: Kit order was placed today. I'm pretty shocked that this is actually happening and real money is being committed. Amy is insane, but she's pretty great.
The kit was specced out to include quite a few options, since they'll (hopefully) make life easier and the 50%-off deal makes it possible. We went with a Type 65 Coupe complete kit (with a base price of $20,990). Of course, we're going to need to have the kit shipped, and Stewart Transport is their suggested carrier, so that's who we picked. Don't have a final price for shipping yet. The options we picked are the gloss black powdercoated chassis ($399 regular price), modern gauges, 302 headers, 28-spline 12.875" driveshaft for use with a T-5 or Tremec 3550, lots of cutouts already done ($149) cause it'll save me time and frustration, the standard vintage low-back aluminum racing seats with padded black vinyl covers, standard 3-link rear package (includes Koni street-friendly shocks, coil-over kit and rear lower control arms, AC/heater/defroster ($1,200 regular price), Coupe windshield wipers ($599 regular price), Coupe floor mats ($99), Coupe pre-cut black interior carpet ($275), battery cut-off switch ($29), Ford-style EFI harness ($499), and Hallibrand replica wheels in 17x9 at all four corners ($1199 + $129 S&H). This should be a pretty complete kit. I also requested a shipping date of 2015-09-01, cause I need time to get things arranged here.
There was no immediate feedback besides "we've received your order and we'll be in touch," so the waiting game was on.
2015-06-16: Got a call from Vinny at Factory Five to confirm my order, go over the options and deal with some questions (from both Factory Five and me).
My biggest technical question at the moment revolves around the rear axle. The kit is designed to use the 5.0L engine, transmission and rear axle from an '87-'93 Ford Mustang, preferably a '91-'93 to keep wiring and sensor headaches to a minimum...But that generation of Mustang (almost, barring some very rare exceptions) always uses four-lug brakes, and drum brakes at the rear. The later SN95 Mustangs were five-lug and disc in the rear in the common five-on-4.5" lug pattern, and the SN95 8.8" rear axle housing is the same as the fox-body 8.8" housing, so it will bolt into the Type 65 rear suspension without problem. However, the SN95 8.8" flange-to-flange width is 1.5" wider than the fox-body 8.8", which means you'd need to mess around with wheel backspacing and such...Not ideal, considering I have wheels already ordered. Since I don't want to run drum brakes, and I want the same five-lug pattern at both ends of the car, and the SN95 8.8" rear-end won't work "out of the box," I asked Vinny what most people do. He said that a company called Breeze Automotive sells fox-length axle sets, caliper adapter brackets and the axle housing flange to caliper bracket bolts necessary to run SN95 calipers and rotors with the proper fox-body width for the wheels. So, I guess I should look for a complete SN95 8.8" rear axle with brakes and such, cause I can re-use the brake hardware. I might not even need the flange bolts if I get an SN95 8.8" axle setup. We'll see what falls out of the parts tree as things progress. I'm not opposed to just buying new rear rotors and calipers, but if I can save a bit by buying a complete SN95 rear axle and re-using the brake hardware vs. buying a fox rear axle and tossing everything but the housing and diff, that would be nice.
Vinny also informed me that the shipping dates were based on saturday dates, so the closest one after 01 September was 05 September...So that's when delivery is scheduled. Almost three months out. I'm cool with that. I have a lot to do before the kit gets here. I'm happy that FFR was flexible with the shipping date, even though they indicated you had to take first-come, first-served shipping on the 50/50 deal page. It never hurts to ask, it seems.
A while after getting off the phone with Vinny, I received the completed invoice of costs and a "what to expect" letter via e-mail from FFR. The invoice had a final kit cost (without shipping) of $23,293, $1,000 of which is already paid as the deposit, leaving $22,293 (plus shipping) due ten days before delivery. We ended up spending $2,174 less due to the 50/50 deal; without the 50/50 deal it would have been $25,467.
FFR deals with Stewart Transport all the time and I'm guessing they've got it down to a science, but I will follow up with FFR to see if I need to contact Stewart or FFR makes the initial contact.
I'm still shocked that this is actually happening.
2015-07-02: Called Stewart Transport to get a quote for shipping the Type 65 to my home...$1,300. Ouch. Oh well. Gotta pay to play, I guess.
2015-07-17: Found a neat video of Peter Brock talking about the origins and some of the aerodynamic advantages the Daytona introduced to racing. The video is definitely worth checking out if you want to know a bit more about why the Daytona looks the way it does.
2015-08-15: My '67 Plymouth Valiant Signet 2dr has been sold and removed from the garage, along with (almost) all of the associated parts. Now the garage clean-up begins.
2015-08-19: Called and confirmed the final kit order, plus got wire transfer details. The only change I made to the kit was to add a passenger-side rear-view mirror since my driver's license has a requirement for both external mirrors. This added a whopping $17.50 to the kit price.
2015-08-20: Funds have been wired. We're committed now. Still shocked this is happening.
2015-09-05: In theory, the Type 65 should be ready to ship from FFR. I haven't heard much from them outside of "we received your wire, thanks." Stewart Transport is supposed to pick up on Monday, but Monday is a Federal holiday...So who knows? The car will get here when it gets here.
After a solid week of hard work, my garage is pretty close to ready for the car. I'm uncertain of the total space required for the chassis and the body when the two are separated, so we'll have to see. Tonight I parked my Jeep in the garage for the first time since I moved in to this house. I guess that's a good sign.
2015-09-11: Finally got in contact with Stewart Transport. My Type 65 is scheduled for pick-up on Tuesday of next week and I'm the third stop for the driver, so I'll probably have the kit here by the end of next week!
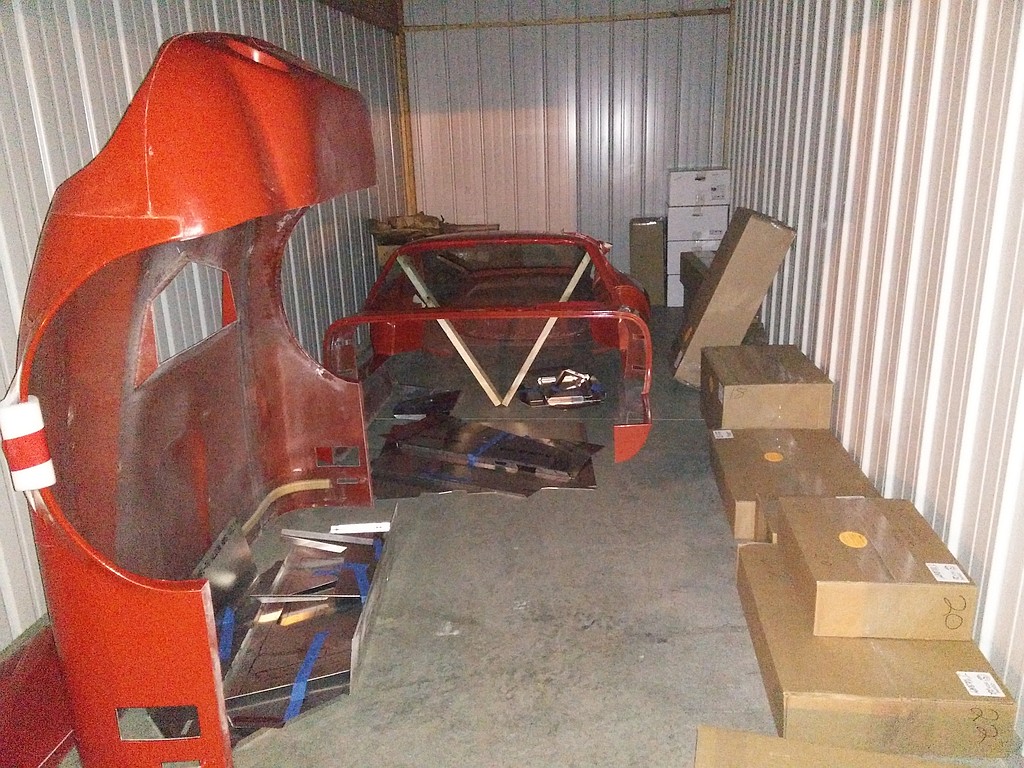
2015-09-21: After much waiting, the Type 65 arrived today! The Stewart Transport driver, Don, knew his stuff; it took less than an hour to get everything offloaded and placed where I wanted it to go in the garage.
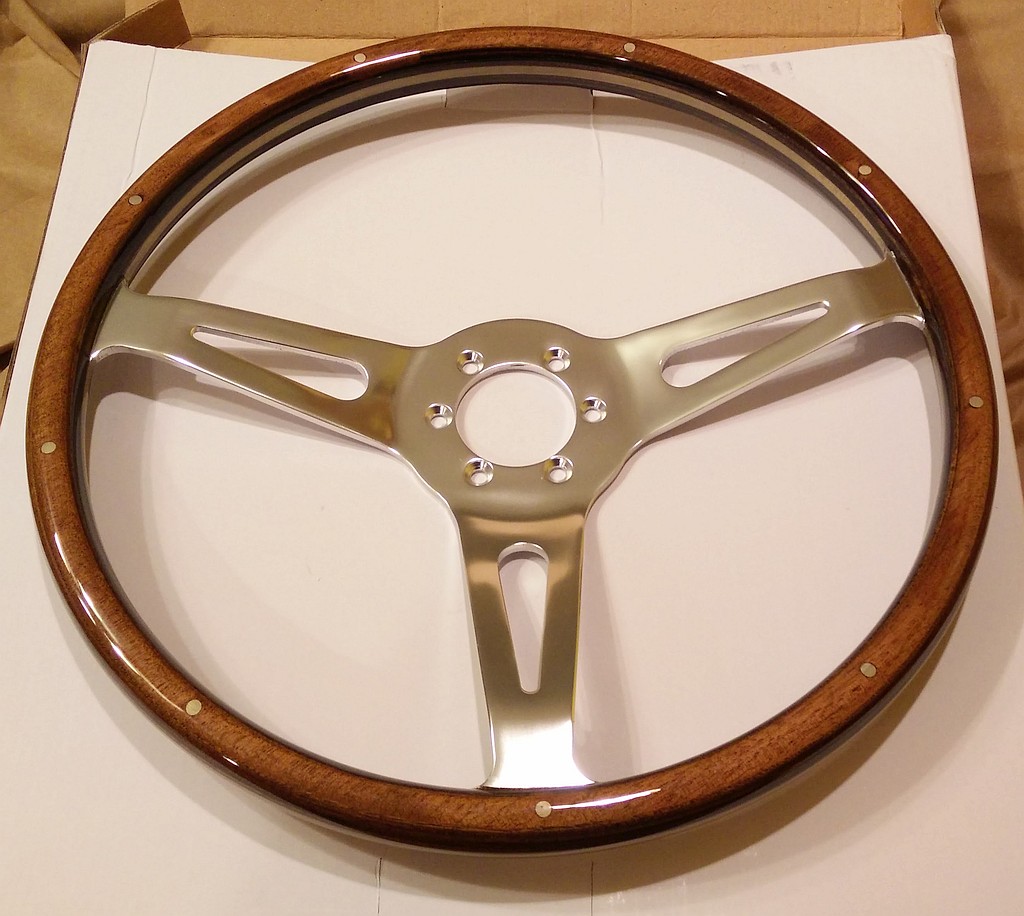
I started taking inventory of the boxes tonight. Boxes one through three were quite time-consuming to go through...But I checked every bolt, nut, washer, screw, wire, spring, clip, and everything else against the packing list. So far the steering wheel hasn't been located; it should have been in box one. Boxes two and three were short one nylon locknut each, too.
The rest of the boxes look to be a lower parts count than the first three, so hopefully the speed I go through the boxes picks up. Also, I hope parts that were known to be out of stock start arriving soon.
2015-09-22: Inventory. My life consists of opening a box, unpacking everything, sorting the bits into piles of matching hardware or related assemblies, then checking off what I have from the packing list for that box. I then note what and how many are missing by drawing an arrow in the margin to that line item's part number, then writing the part number and how many are missing at the top of the page. If there's nothing missing—which is the vast majority of boxes—I just write 'complete' and the date on the top of the packing list. Any notes get written on the top of the page as well. The finished packing list then goes in the "inventoried" pile. I grab the next box and packing list, then start the process again.
Box 6B is actually two boxes, box 1 and 2...Two really annoying boxes. Those two are a lot of the engine, interior and hatch-area aluminum interior panels, plus the rivet spacing guide and several other small aluminum pieces. . I set those two boxes aside to do later, cause they are packed in a very specific way and I'm guessing it's going to be an absolute nightmare to get that stuff packed back into the box. I'll need lots of room to unpack those boxes, so not tonight.
I've also started writing the box number on all sides of the box, so I can identify a box without having to look for the FFR label. Not having to hunt for box numbers will probably save me a lot more time than it took to write the numbers on the boxes.
I'm through box 12K tonight, not counting the Box 6B fiasco. The next few packing lists are low-parts-count boxes—driveshaft, exhaust, A/C system, and so on—so I should get a ton more done tomorrow night, too.
2015-09-23: More inventory. Made it through box 21 tonight. Only three more left! Found some more missing parts, but nothing major. Steering wheel hasn't turned up yet. Box 23 seems like a catch-all box—it doesn't even get a packing list—so maybe my steering wheel is in there.
2015-09-24: Finished taking inventory tonight. Box 23 had a lot of stuff that was listed on packing lists for other boxes as being in box 23, but two pieces that were supposed to be in box 23 weren't there. That's a bummer.
Finally unpacked both boxes for box 6B. What a pain. I was right; getting everything back into the boxes didn't happen. One of the boxes went back together okay, but the other just didn't work out. I've got left-over aluminum pieces wrapped in paper now. Fun. The box contained almost everything on the packing list, but I'm one short. The problem is I don't know which one. There were seven aluminum panels I couldn't identify, but eight pieces that aren't accounted for. I have some idea what the seven pieces are, but I'm asking for help.
I e-mailed a list of what's missing to Vinny at Factory Five. All in all, there were twenty parts on the list. Some are very minor—nuts, bolts, hose clamps, terminals—but others are quite important. The steering wheel never turned up. The directions for assembling the windshield wipers weren't there. The aluminum mesh pieces that make up the side and rear grills were supposed to be in box 23 but weren't, so I told FFR about that too. Some parts are items I'm not sure I'm missing, like a pair of countersunk washers used on the lower control arms. The packing list says the front lower control arms should come disassembled, but mine were already assembled, so maybe my missing countersunk washers aren't missing. I asked Vinny about that as well.
I'll happily source the nuts, bolts, hose clamps, and terminals locally if they can tell me what grade the specific nuts and bolts should be.
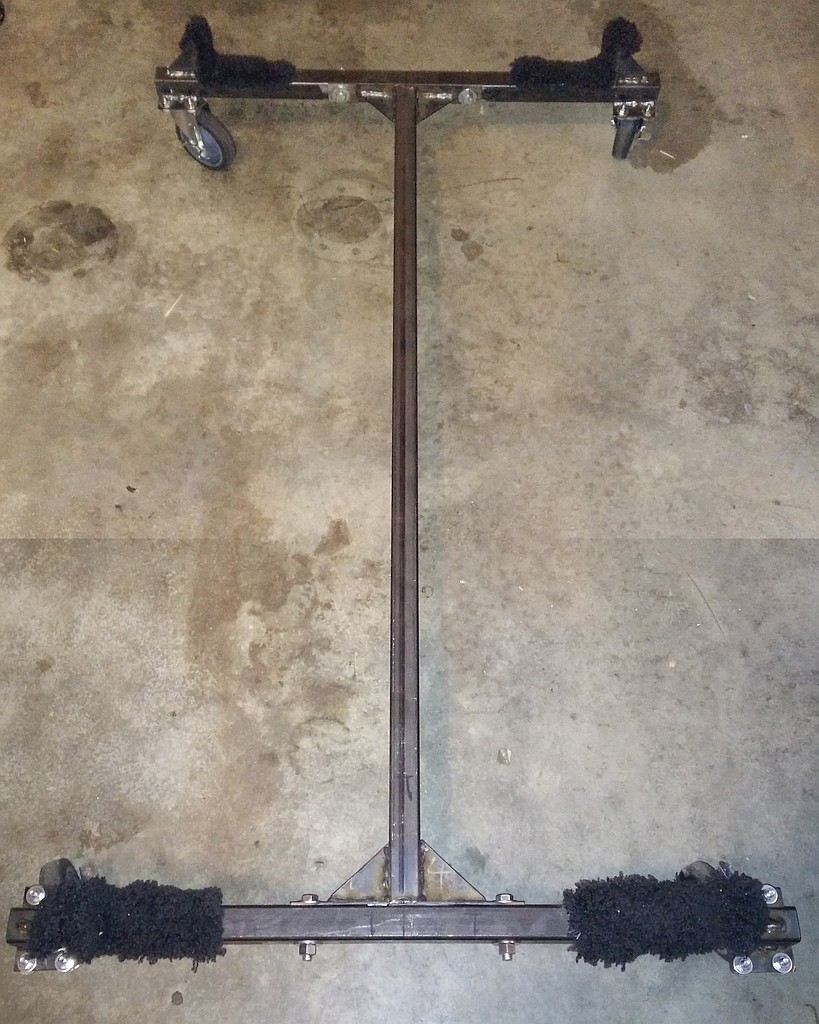
Tomorrow evening I'll start figuring out dolly dimensions. I need to see if I can find at least 500-lb-rated casters locally. If I can get casters tomorrow, then I'll be able to fab up the dolly and get the Type 65 off jackstands. After that I need to start figuring out where to store stuff.
2015-09-26: Dolly fabrication. Last night I took some measurements and looked at some other dolly designs out there, hunted down some casters that will work until the chassis gets to "roller" stage, and pinned down the basic design for the chassis dolly. 5' OAL, 3' long pieces with 3" uprights spaced 29" apart—the frame tubes are 4" round tube spaced 24" center-to-center, so 29" gives me some wiggle room and lets me put some padding in place—with some gussets behind the uprights. The center piece has an 11" long piece of flat stock at each end, gussets back to the tube, and bolt to the end pieces through the plate with 1/2"x2-1/2" bolts. Caster plates will be welded on directly under the tube location on the end plates. The main dolly frame itself is constructed of 1-1/2", 1/4"-wall square tube. Most of the gussets and other plates are cut from 1/8" or 3/16" flat stock, which is just whatever I had on hand.
Fab went mostly as planned, outside of a drill bit stuck in the chuck on my drill press. That took a while to get out. Everything is cut, drilled and sanded; tomorrow I'll weld stuff up, add some padding and hopefully get the Type 65 off jackstands and on to something I can move around.
Amy is at the breaking point for boxes being stored all over the house. I don't really blame her; there are a lot of boxes in the way. I guess I'll have to find a storage unit. Will call about that on Monday. If I can stick the body in there too, that would be swell.
2015-09-27: Finished dolly fabrication. Everything went pretty much as planned and everything fit right with no final filing and such. I'm getting better at this fab stuff.
I'm going to cut an old bathroom rug into strips to put on the dolly where it will contact the chassis. I also still need to pick the dolly up from my folks' place (where my welder lives) cause my Jeep isn't large enough to move the dolly, even when it is disassembled. I'll do that tomorrow. I'll also be calling about a storage unit tomorrow.
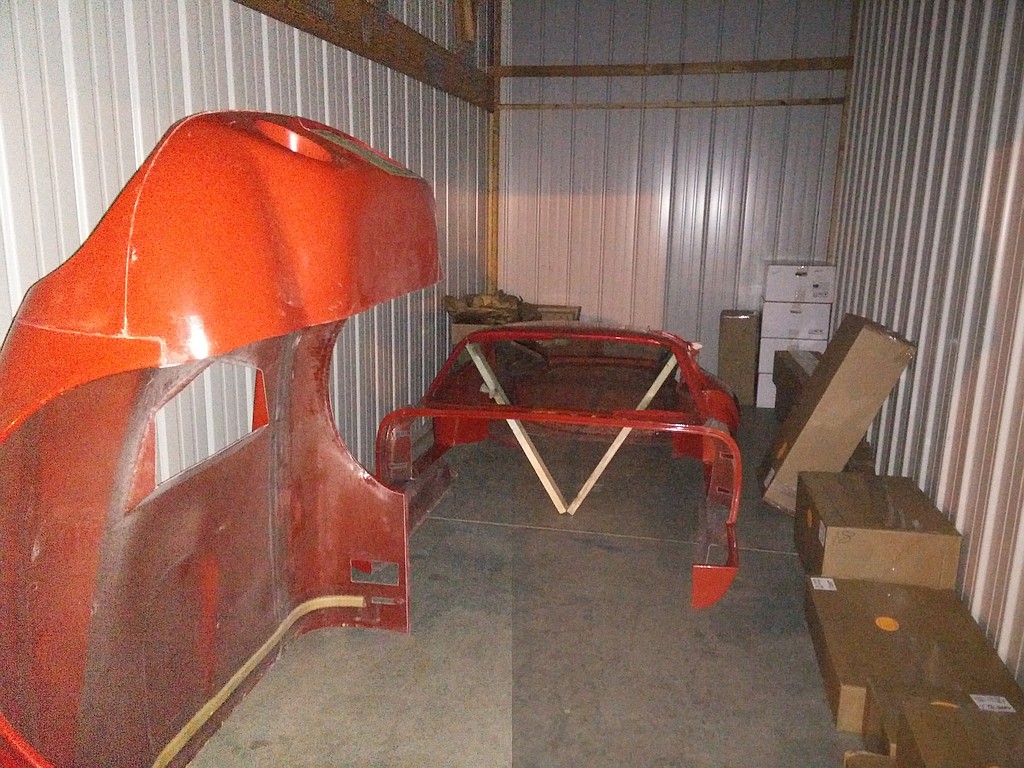
2015-09-28: Storage unit obtained...A big 10'x24' jobber. Only costing me $115/month. I guess I'll be eating a lot more lunches at home. Anyway, most of the boxes have been relocated there. Amy can now walk where she wants in the house without tripping over boxes and can get to the bookshelves she wants. The storage unit isn't far from the house, so when I invariably need something from a box that's in storage I can just run up there and get it. The storage unit is big enough to hold the body, so I will most likely take the body and nose there once they are off the chassis. Hopefully I can find someone with a flat-bed truck willing to help.
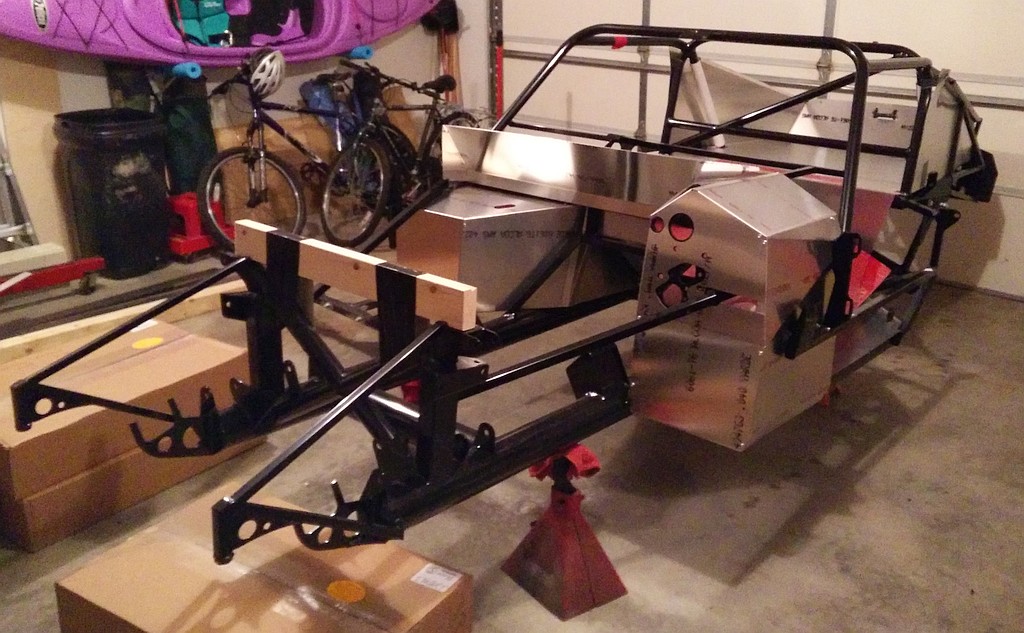
The nose is off the car and currently standing vertically in my garage. Kind of neat. Next up is removing the main body, but I probably won't do that until I've got transportation for the body to the storage unit arranged.
My dad was a big help tonight. We used his van, and he helped move boxes as well as remove the nose. He also loaned me a pair of snap-ring pliers, which are required for assembling the coil-over arrangement. Thanks, Dad!
I probably won't get much done over the next few nights. There are other projects around the house (and someone else's house) that need attention, plus a band rehearsal on Thursday night.
2015-10-04: After finishing my weekend projects I was able to get back to the Type 65. My Dad borrowed a trailer from his co-worker, which we had to retrieve. He was originally going to help me move the nose and body into storage, but ran out of time. He ended up leaving the truck and trailer at my house in case I could arrange for assistance.
Fortunately, my friends Sam and Andrew weren't up to anything this evening, so I arranged for them to come by around 7:30 PM to give me a hand. Before Sam and Andrew arrived, I was able to cut up an old kitchen rug and stick some of the pieces to the dolly where the chassis tubes will sit or contact. It looks like shag carpet. I also cut a 2x4 into the proper-length bracing to support the body while it is off the chassis and removed the fasteners holding the body in place.
Sam and Andrew showed up right on time. I had a fun time getting the trailer into the driveway—I have no previous trailer-maneuvering experience—but Sam and Andrew were able to guide things where they needed to go. After a bit of trial-and-error, the chassis has been relieved of its body, and the body/nose have joined some boxes in the storage unit. I didn't put the chassis on the dolly tonight; I'm waiting til the rest of the interior panels are removed before doing that.
I should get the remaining aluminum panels marked, photographed and removed from the car over the next few nights. After that's done, I can start putting stuff on the car! Yay!
Update: I went out and decided to remove the rear aluminum. Screw the engineer that decided to produce the trunk floor as one big piece; it is an absolute nightmare to remove...So much so that I am giving up for the evening. I got a couple of pieces out...Only to realize I forgot to draw outlines in certain places, so I will have to put those pieces back in and draw the outlines. Lesson learned.
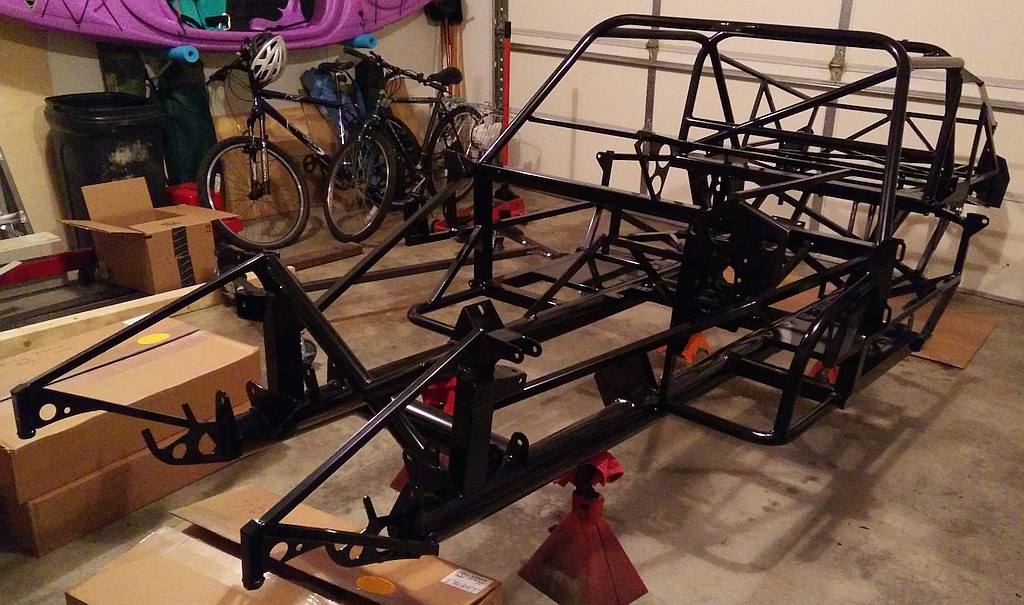
2015-10-05: Busy evening. Tackled the aluminum marking, photographing, and removal. Managed to get it all off. Bent up one of the corners near one of the cutouts on the trunk floor and slightly bent some aluminum between two cutouts on the same piece. What a pain to remove. I'm not looking forward to putiing it back in, either. I also probably need to look for scratches through the powdercoating now, too. Yay. :( Disassembly has now officially been completed, cause the chassis is bare except for the panhard bar frame mount.
A note about the trunk floor...Bow it up in the middle as high as it can go, then start working the cutouts out by flexing them in between the mounts/tubes. That's how I did it. Not sure that's the right way, but it worked for me.
The cockpit floors were also a pain to remove. The right-hand one was a lot worse than the left-hand one.
I borrowed my folks' van again—thanks again, Mom and Dad!—and took all of the aluminum up to the storage unit instead of leaving it laying all over the garage. I taped the aluminum bits together in groups (e.g. right-hand footwell, left-hand footwell, firewall, trunk, cockpit misc) so hopefully they will stay organized. I hope I'm done taking bits up there for a while.
Got a box from FFR today containing almost all of the items I listed as missing from my kit that weren't included on the POL, including the steering wheel. Now I'm just waiting on POL items and I should have a complete kit.
Tomorrow, we start assembly.
2015-10-09: Okay, so not exactly tomorrow, but assembly did start tonight. I got delayed a few days cause I wanted to make sure my torque wrench was up to the job...It wasn't. It was off by nearly 100%—calculated torque was 24.65 ft-lbs., but the wrench was still clicking at 46 ft-lbs.—so last night I ended up buying a Duracraft Pro 20-150 ft-lbs. torque wrench from Farm & Fleet. It was pretty close to spot-on with my testing with weights. Moving on...
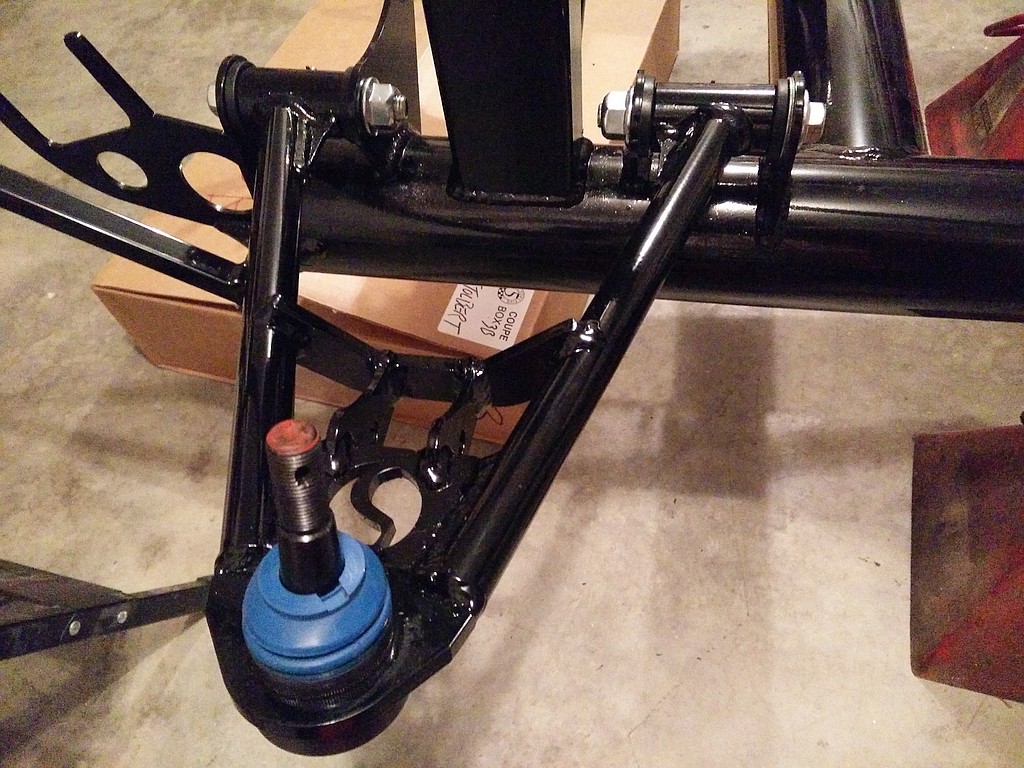
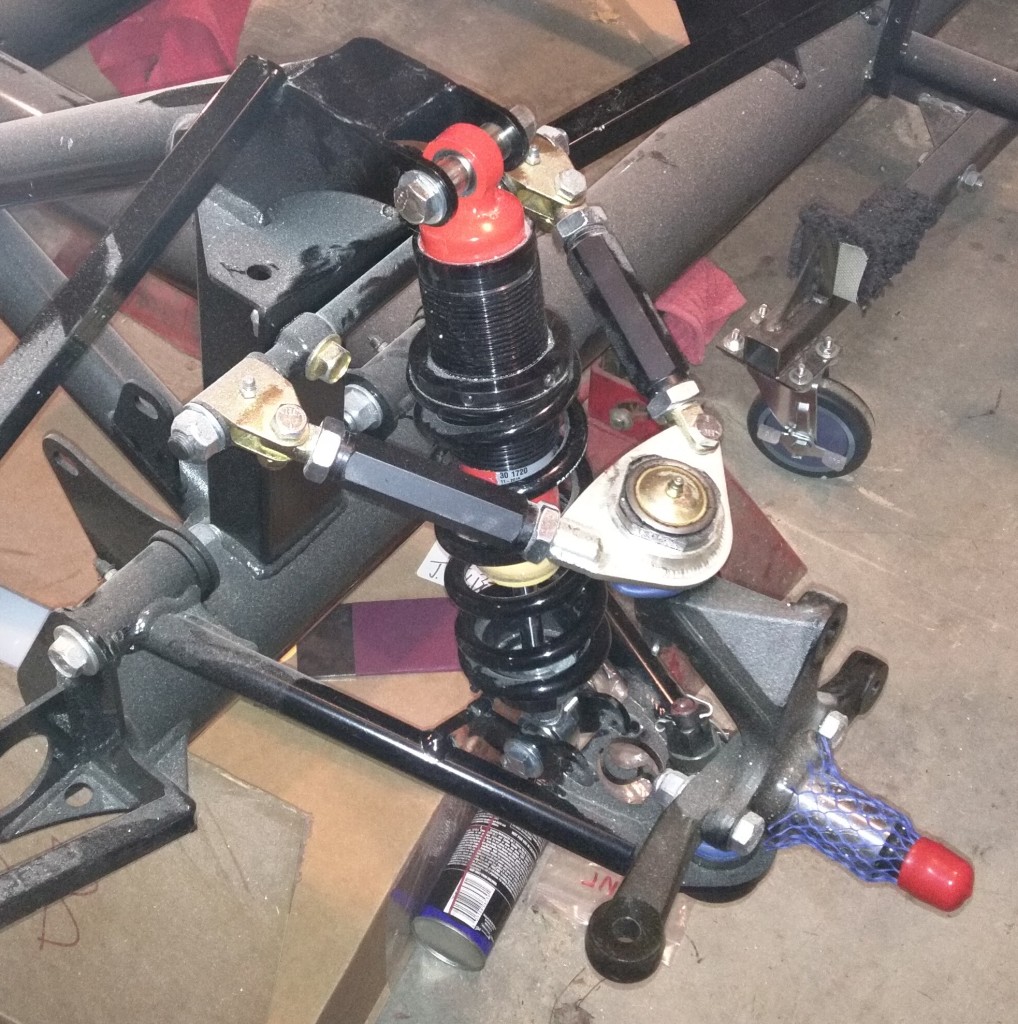
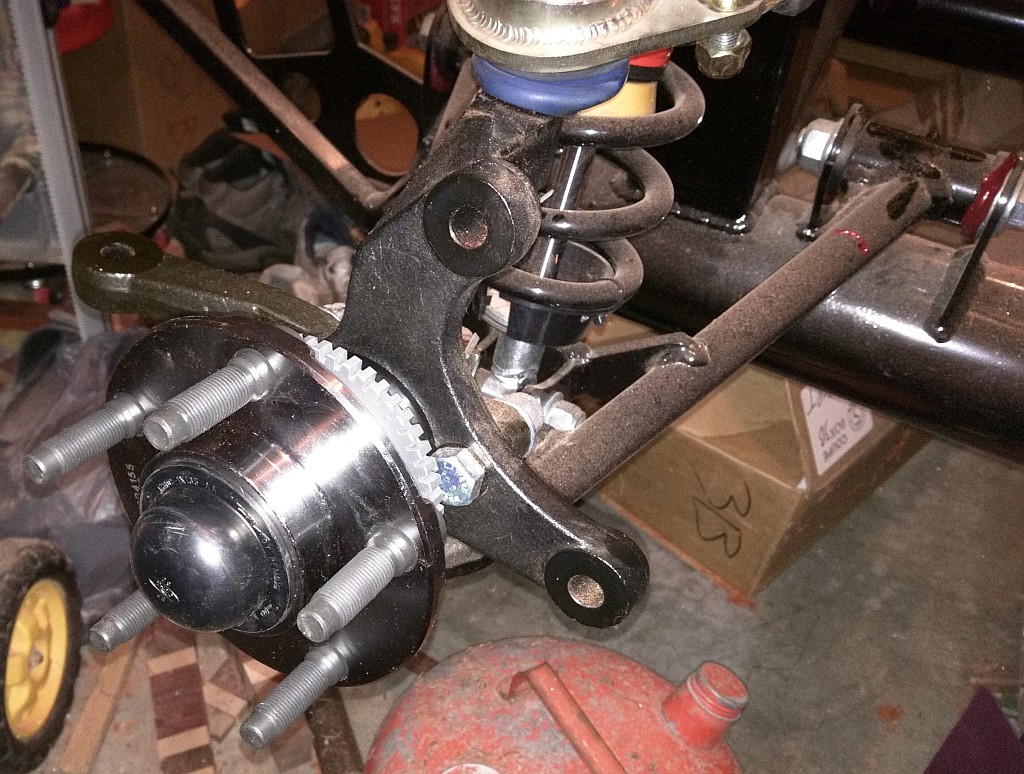
Tonight I got the left-hand and right-hand front lower control arms mounted. Nowhere in the documentation did it mention that you'd need to use a big washer as a spacer between the rear bushing and the bracket, but some forum posts indicated that was the case. The left-hand LCA went on pretty easily, but I did have to drive that washer in after the arm was in place and the front bolt was started using a screwdriver and rubber mallet. Both bolts on the left side had to be hammered through, but beyond that everything went fine for the left-hand LCA.
The right-hand front LCA was a completely different story. The mounts were just a tick tighter on the right-hand side, but that was enough to make the right side an absolute nightmare. I didn't have to resort to bending mounts like some forum members report having to do, but I did have to slide bushing sleeves over inside the polyurethane bushings, pull one side of the LCA slightly in to its mount, tip the other side in and coerce everything in to position. This required considerable adjustment of bushing sleeves, since they stick out on both sides of the poly bushing and clearance to the inside of the LCA was tight. Once both sides of the LCA were in place, I then wedged a screwdriver in between the bushing sleeve and the rear ear of the rear mount, applied a bit of force, spreaded things apart just a tick and drove the washer in to place. It took considerable jiggling to get the bolts started, and the rear side of the arm had to be levered up with a crowbar to get the bolt to exit through the other side of the mount. Both the front and rear bolts took considerable driving with a rubber mallet to get them through the other side of the mount far enough to get the nuts started, but at that point I could just put a ratchet on the bolt and hold the nut still, then crank the bolt down. I'm glad that's done.
There isn't a lot of space to get the front bolts started, since the core support is right near where the bolt head ends up when you start to run the bolt through the front side of the mount. Gotta be careful.
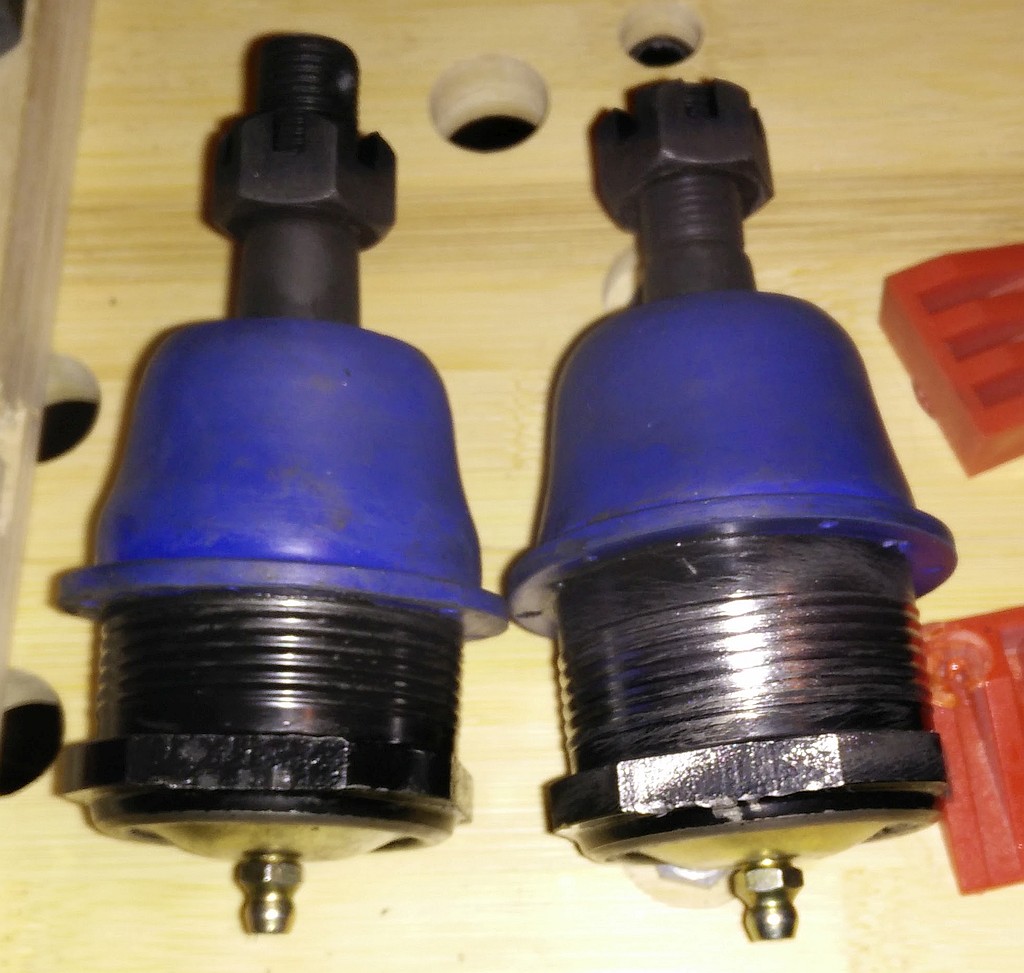
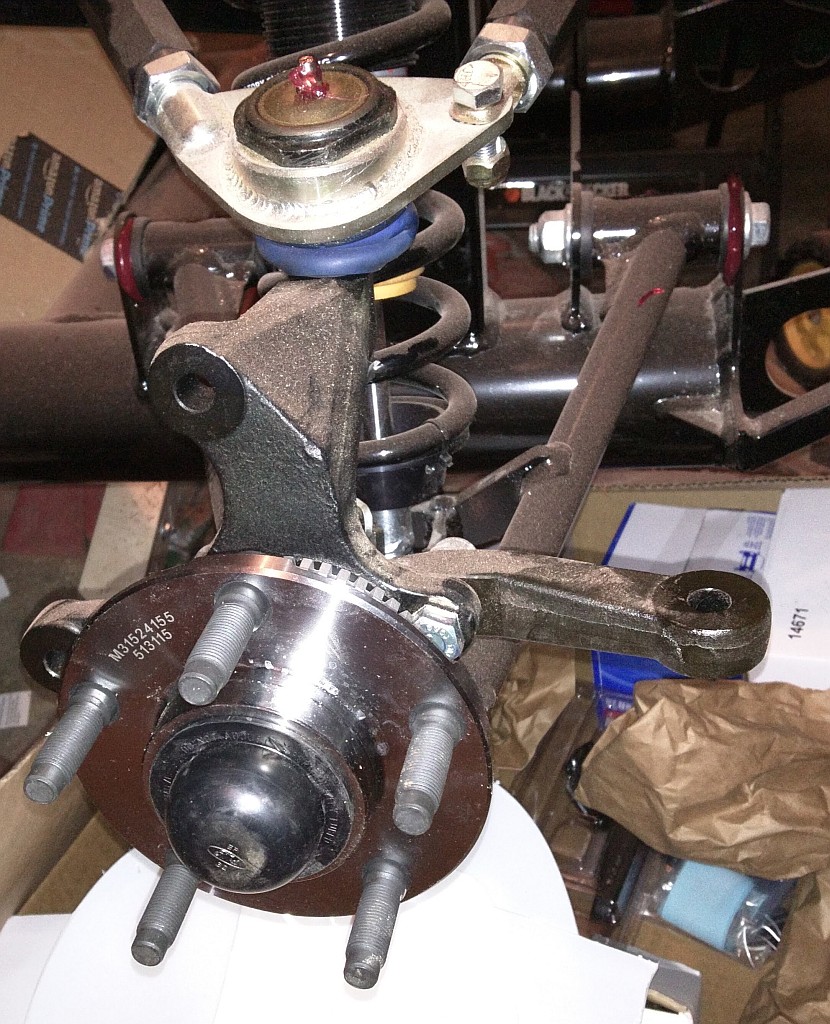
Next up was screwing the upper ball joints into the front upper control arms. In short, that didn't happen tonight. FFR sends some Mevotech MK772 ball joints for the front UCAs, but they are extremely difficult to screw in. Forum posts indicate that you can try the ball joint in the other UCA to see if it fits better, but most people end up either wire-wheeling the finish off the Mevotech ball joints or buying some Moog K772 ball joints, which apparently go in with very few issues. I'm guessing I'll shop around tomorrow and see if anyone has the Moogs on hand.
So I had difficulties with the front LCAs and a complete show-stopper on the front UCAs, plus probably $50+ in parts to make the UCAs work. I hope this is not an indicator of things to come.
2015-10-10: I'm actually writing this the next day. I ran out of time last night.
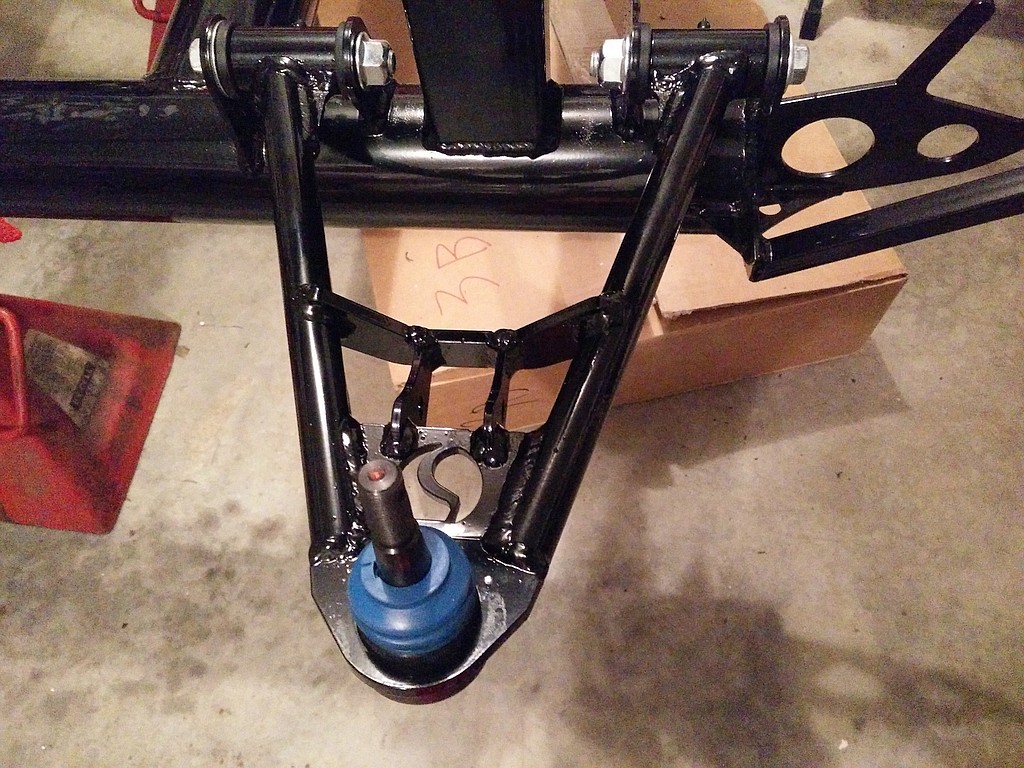
Wire-wheeling the finish off the ball joints did the trick. I've got a pic of one ball joint with the threads cleaned up next to the other with untouched threads. It still took quite a bit of muscle and a visit to a location with a big vise clamped on a sturdy workbench, but I got the ball joints loctited and screwed in to the UCAs.
The UCAs went on to the car without too much hassle, except the rear mount bolt is so close to the top of the box it's passing in to that I either had to jam a screwdriver between the locknut and the box to keep the locknut from turning, or hold the wrench at really bad angles on the locknut to keep it from moving. Anyway...The UCAs are installed.
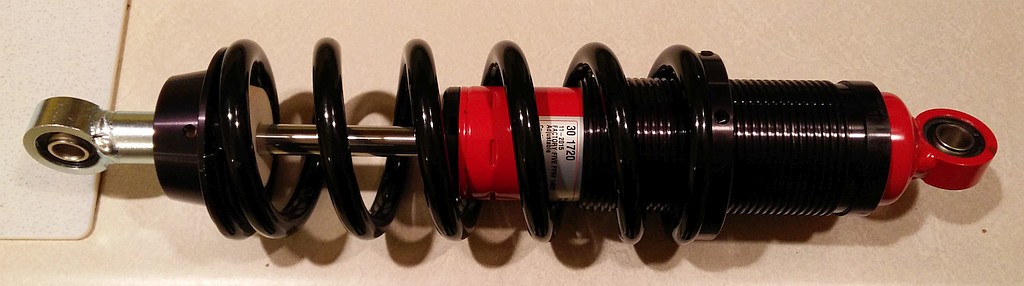
Next up was the coil-over setup. One went together pretty easily. Neat system. The other coil-over sleeve is too snug on the shock's body to slide down the tube. The problem moves with the coil-over sleeve. I'm thinking I'll try heating the sleeve while freezing the shock, so that's on the agenda for tomorrow.
2016-05-17: Back to it. FFR eventually sent me a shock and sleeve that fit together properly for the front, but I still have to assemble one side of the front suspension. Having trouble getting the spacers to fit the bottom of the left-side shock...May have to grind. Joy.
Picked up a donor car: a very rusty 1990 Ford Mustang LX hatchback 5.0 5sp, for the princely sum of $1,000. The car has a broken-out right-side torque box, so hopefully the rear axle or mounts aren't bent up, but the engine and trans seem quite decent. Now I have to clean my garage up again.
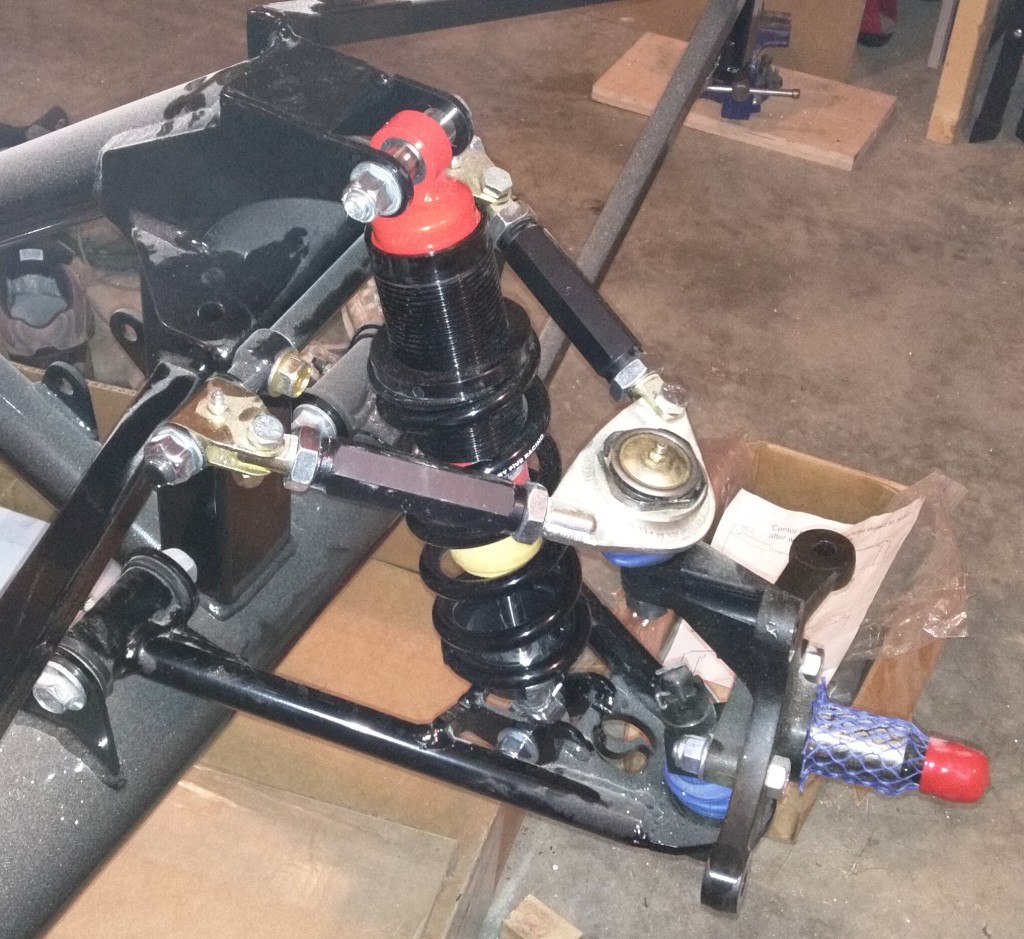
2016-05-23: Real progress! I got tired of not getting anything done on the car, so I decided to finally put the front coil-overs to bed. I ended up putting in about two hours on the car this evening. I zip-tied the springs to the hats before doing anything else, cause getting the zip-ties in place after the coil-overs were bolted in would have been difficult.
The bottom spacers on both sides were way too wide. Originally when I tried to make things fit, I was using a cheap file to take some material off the faces of the spacers. After doing some digging tonight, everyone suggested using 120-grit or 180-grit sandpaper...So that's what I did. I grabbed some 120-grit sandpaper, wrapped it around a piece of 1/8"-thick, 4"-wide steel plate I had laying around, flopped the sandpaper/plate on my workmate and did twenty seconds of swirling each face against the paper. Did both sides of both spacers for each side of the car, to try to keep things even. It took a good amount of sanding...More on the left side, but it worked. Both coil-overs are bolted in and torqued to spec. Yay!
So...Yeah. The left side and the right side of the front suspension are assembled! Yay! I may actually be able to throw away a box soon.
I was supposed to be cleaning up the garage...And I did work in that direction. Parts going on the car means less clutter in the garage...Right? :)
2016-05-24: Not much done tonight. Ordered a black G2 caliper paint kit so I can paint the front calipers and brackets black before I put them on the car. I figure black calipers will look good with my wheels and whatever paint I end up going with.
Amy purchased a creeper for me! It is pretty spiffy, and a hell of a lot more comfortable than the creeper I had before. She's great.
2017-05-16: ...Wow. I don't know where to start. I am sorry to anyone that has been following along, but hasn't seen any updates in almost a year. I've been rambling about the car on IRC, but that's about it. I have got some stuff done...But not a lot of it is visible.
The '90 Mustang I bought has been looted of its engine, trans, and rear. The car left for scrap a few months ago (with help from Andrew to deliver it to the Ford lot in the sky). I had to sawzall a couple of the control arms to get the rear out of the car, cause the bolts weren't coming out without a fight. Once I had the rear out I was able to burn up the bushings with a MAPP gas torch, which let me move the control arm over enough that I could then stab an angle grinder in there and cut the bolts into pieces. Fun...But the axle has been relieved of its axle shafts and the control arm stubs have been removed.
I picked up a set of GT40P heads off Craigslist for $150. They went to the machine shop for a good going-over, including checkout, three-angle valve job, milling, new Comp springs/locks/retainers, and Alex's Parts viton OEM-style valve stem seals. That was not cheap, but the heads should flow well with a stock bottom-end and the cam I picked.
I also traded the Weld Draglites off the car for an early Explorer (occasionally called GT40) upper and lower intake setup, already painted black. I still have to drlll/tap the ACT sensor boss, but I'm not going to bother with the TB water lines or any of the EGR passages, since the GT40P heads don't have provisions for the internal EGR arrangement anyway.
After much deliberation, I also decided on the cam I want to run. I'm going with a Comp XE270HR, p/n 35-351-8. It's a good, solid cam that will work well with my engine, the weight of the kit car, the rear gears I want to run, the T5, etc. It's not the hottest thing out there, but it should be pretty damn fun.
So, about the car itself, I have actually done a few things on it. Amy purchased a grease gun for me, and I picked up a few tubes of Mystik high-end grease...Before I found out that Citgo, makers of Mystik, is owned by the Venezuelan national/nationalized petroleum industry...And I'd really rather not support them. Eh, whatever. It's only two 14oz tubes of grease. Along those lines, the front-end is greased, plus I got the left and right hubs installed. Progress! After such a long time doing nothing, it feels good to be working on the car again.
I'm going to paint the calipers and get them on the car soon.
2017-05-17: I'd planned on painting calipers tonight. I retrieved the calipers---box 21, front brakes---from the storage unit, got my caliper paint, tools, foam earplugs, nitrile gloves, extra brushes, painter's tape, and a wrench to remove the bleeder screws together and relocated to my folks' place---where I'm going to paint, cause they've actually got room---but after helping my dad out with a few things, plus not getting over there til around 10:00 p.m. in the first place, I just decided to hold off til tomorrow. Oh well; Amy is going out with a friend tomorrow evening, so I should be able to get right to it after work tomorrow.
Costs are here for interest only. The numbers often come from receipts, but sometimes there's no tax break-out for each item and I'm too lazy to calculate the tax myself. I'll include the cost for tax and shipping when I have it.
I'm keeping track of tools separately since others may not need to purchase the tools for this project. I am not including costs for tools I already own.
| Part, item or service | Source (vendor or retailer) | Cost | Date purchased | Notes |
|---|---|---|---|---|
| Parts and materials | ||||
| Type 65 Coupe complete kit | Factory Five Racing | $23,310.50 | 2015-06-13 (deposit) | The kit! 50/50 deal cost us $2,174 less than it would with no deal. Revised on 2015-08-19 to include the $17.50 for the passenger-side rear-view mirror. |
| Shipping | Stewart Transport | 1,300 | 2015-07-02 | Shipping for the kit through FFR's preferred transport company. |
| Drivetrain donor | Private sale | 1,000 | 2016-05-17 | 1990 Ford Mustang LX hatchback 5.0 5-speed. Has a torn-out right-side torque box, so I'm hoping the rear has good mounts. The body is rusted to hell, but the Weld Drag-Lites may be re-sellable. Engine and trans seem solid. |
| G2 black caliper paint kit | Amazon | 39.81 | 2016-05-24 | G2 caliper paint is known for looking decent and being very durable. I decided to paint the front calipers and brackets black while they are off the car and clean, so I don't have to fight with them later. Will probably do the same for the rear calipers down the road, but will just order another kit later. |
| Total cost for parts and materials | 25,650.31 | |||
| Tools | ||||
| Duracraft Pro 1/2"-drive 20-150 ft-lb. torque wrench | Farm & Fleet | 42.29 | 2015-10-08 | My Thorsen torque wrench was junk. This one appears to be pretty decent. |
| Total cost for tools | 42.29 | |||
| Total cost | 25,692.60 | |||
Page created 2016-06-16 23:37 CDT.
Comments? Suggestions? Hate mail? Send them to hemi@puresimplicity.net.