


My Experience Running Icewind Dale: Rime of the
Frost Maiden
Introduction
I have loved the Dungeons & Dragons (D&D) Icewind Dale setting ever since playing the Icewind Dale games by Blizzard. So naturally when it came time to pick my first D&D adventure book, this was at the top of my list.
I watched a lot of YouTube videos and read a lot of articles on Rime of the Frost Maiden (RotFM) because I wanted to be the best Dungeon Master (DM) I could for my players. This article will be sort of a blog or story of my experience running it for the first time. Please, if you visit this page often, click refresh, as I add content on a weekly basis.
Non-Spoiler: Character Creation
If you are trying to create a character for Rime of the Frost Maiden, I'm going to give you some non-spoiler advice:
- Choose a race with dark vision: you'll need it.
- Use the rule about allowing a +1 weapon (but with a back story, like an heirloom). You'll need one +1 weapon.
- Try to take proficiency in survival. Your character, to have survived the journey to the Icewind Dale region of Faerun, should have honed their survival skills by now.
- The encounters can be difficult, especially at first, and
potion sellers could be scarce due to the poverty caused by
the everlasting winter, so try to pick a class that can at
least have one spell slot of healing, or take Magic Initiate
feat to gain access to one slot of healing. I am not
saying you can't play fighter or barbarian, for example, but
always have one person in the party who can heal.
I left some space here so that you could read this without
scrolling down into Spoiler territory.
WARNING: SPOILERS BELOW!
Chwingas, Fishing, and Black Swords
In my first session, I did not have the starting 4 players due to people having to cancel at the last minute. Indeed, I would've had only 2 players if some other DM's campaign didn't get canceled for lack of participation. So with three players, we forged ahead. We were playing at a gaming center that has miniature figurines and tables with a big screen TV built in for displaying maps.
I had used Linux ffmpeg and handbrake to
take scanned PNGs of the maps on the pages of the RotFM book I
bought, coupled with free MP3s of the sounds of winter
storms. I do not distribute these, only using them for the
campaign, so as to preserve copyright. But I found that
this solution was less than ideal.
I had my players pick their secrets. I decided to let them all have one +1 (uncommon) item to start off, and 50 gp. Then instead of rolling to figure out where we would end up, I had already read most of chapter 1 and sent us to Bremen. First, I had them run the chwinga quest, and as a reward, I gave them the equivalent 20 experience (XP) they would have gotten if they had killed the 3 chwinga (but they did not). Then I sent them to fish for knucklehead trout. With every fish they caught, I gave them 20 XP because that would be the same XP they would receive if they had killed the trout outright. They "defeated" the fish when they caught them, and anyone who has run this adventure knows it's not easy to fish for them at lower levels because they will try to pull you into the frozen lake.
I didn't roll the lake monster event, so I basically kept encouraging them to fish until they did. It just happened that the lake monster attacked their boat twice, but in the process of the second attack, the barbarian (being themselves) yelled at the plesiosaurus in anger. So naturally I ran the intervention in the book and they convinced the plesiosaurus to not attack fishing boats any more, and so then I gave them the XP as if they had defeated it in combat. This leveled the party up, making them capable of subsequent quests.
Currently the party is doing the Knights of the Black Sword quest in Caer-Dineval. They were able to defeat all enemies in this quest so far.
The only modification I have made so far is that the speakers of the towns are not to blame for the sacrifices to Auril, an idea from a YouTuber, which one I have forgotten. Instead, the frost druids have been encouraging such sacrifices in order for people to worship and fear Auril. This way there is a more clear enemy, and players will not be tempted to dispose town speakers in order to reestablish order. (Though they may end up removing some through the various plots.)
The first thing I did was pull out the book
and write down what it claims on the various ten town pages for
travel distance on foot (by the book). However this
chart is only offered out of courtesy: don't use it, but
use my improvements below.
| TRAVEL (BOOK, ON FOOT, HRS) |
TARGOS |
CAER-DINEVAL |
EASTHAVEN |
GOOD MEAD |
TERMALAINE |
BRYN SHANDER |
CAER-KONIG |
DOUGAN'S HOLE |
BREMEN |
LONELYWOOD |
| BREMEN |
2 |
|||||||||
| BRYN SHANDER |
2 |
10.5 |
7.5 |
6 |
6 |
|||||
| CAER-DINEVAL |
9 |
8 |
10.5 |
2 |
||||||
| CAER-KONIG |
2 § |
|||||||||
| DOUGAN'S HOLE |
4 *** |
|||||||||
| EASTHAVEN |
9 |
4.5 |
7.5 |
|||||||
| GOOD MEAD |
8 |
4.5 * |
6 |
4 |
||||||
| LONELYWOOD |
2 §§ | |||||||||
| TARGOS |
4 |
2 |
3 ** |
|||||||
| TERMALAINE |
4 |
2 |
* On page 72, it claims miles, not hours, but page 59 said 4.5 hours, not miles. This is probably a misprint.
** This one claims there is no actual trail between Targos and Bremen (p. 86). This means it may need to be factored out due to different walking speeds.
*** Page 53 says this is a 6 mile long trail between Dougan's
Hole and Good Mead. Page 11 describes overland travel, not
on a path, as taking much longer.
§ Page 46 says a 3-mile path connects Caer-Konig to Caer-Dineval and it takes 2 hours.
§§ Page 79 says a 3 mile path connects Lonelywood to
Termalaine and takes 2 hours.
After computing the chart, I pulled up the
map and noticed that between Bryn Shander and Easthaven, and
between Caer-Dineval and Good Mead, there is a road intersection
where the road map looks slightly like a crossroads. I
then did the algebra and computed that between Bryn Shander and
the crossroads should be 4.75 hrs, between Caer-Dineval and the
crossroads should be 6.25 hrs, between Good Mead and the
crossroads should be 1.75 hrs, and between East Haven and the
crossroads should be 2.75 hrs. The math does not entirely
work out, however, because Bryn Shander should take 11 hrs but
instead it takes 10.5 hours. Is there an unpublished
shortcut?
The problem is, p. 11 versus p. 46, p. 53,
and p. 79. I sat here trying to figure it out, how it
could be different, then it dawned on me that p. 11 is talking
about travel without trails, which would necessarily be
longer. So I calculated the only three places we are given
hours and miles and this seems to imply
1.5 mph walking speed on the trails. With the map being
slightly off, scale cannot really be calculated, so trying to
figure overland travel (for instance) from Bryn Shander to
Caer-Dineval is not entirely possible. I formed my best
geometric guess (but I used actual math to
do it) as to how long overland travel by dog sled
would take, rounded up to the hour:
| Dog Sled Geometric Overland Travel Guesses |
CAER-DINEVAL |
BRYN SHANDER |
CAER-KONIG |
| BRYN SHANDER |
12 HRS |
||
| DOUGAN'S HOLE |
5 HRS * |
||
| TERMALAINE |
11.5 HRS * |
13.5 HRS * |
Note that some of these journeys, if done over land rather than road, my take longer (like Bryn Shander to Caer-Dineval) but some may be shorter. Also, you'd think that venturing near the dwarven valley would result in some sort of quest trigger, but it does not seem to. Anyways, times marked with an asterisk are shorter than using the roads. Again, I did my best using geometry, but the map isn't perfect and the roads are not straight lines, so these are best guesses.
Also note that if you venture outside of the trails (and maybe even if you're on the trails) in Ten Towns, you might need to consult the p. 105 wilderness encounters.
Ten Towns Map Improvement
A year later, after running the campaign, I decided it was time to update the travel distance. I was listening to various YouTube videos on the topic and preparing for my second run, when I heard Eventyr Games point out that travel is not realistic. And he was right: I looked and noticed that, at least between towns with roads that are not snowed over (unlike the path from Targos to Bremen), on foot should not be the equivalent of 0.5 MPH. Walking is roughly 3 MPH easily, so this should be the speed on roads. Dog sleds in Alaska can go 6-10 MPH, so I assume 6 MPH off road and 10 MPH on road. Snow shoes likely would only slow an individual down to 2 MPH on roads and 1 MPH off road.
So I constructed, in my opinion, a better map with miles (estimated). I basically had to use the actual provided map with the mileage ruler. That way the DM can simply look and simply decide what distance and speed. This allows flexibility so that, for example, if there happens to be a snowstorm, one can reduce speeds and not have too many speeds listed on every chapter. I also added hints as to how to get from one place to another going through another city. Here is my chart:
| ROAD TRAVEL (MILES) |
TARGOS |
CAER-DINEVAL |
EASTHAVEN |
GOOD MEAD |
TERMALAINE |
BRYN SHANDER |
CAER-KONIG |
DOUGAN'S HOLE |
BREMEN |
LONELYWOOD |
| BREMEN |
2* |
21.5* |
19.5* |
18* |
14* |
5.5* |
25.5* |
22* |
16.5** |
|
| BRYN SHANDER |
3.5 |
16 |
14 |
12.5 |
15.5 |
20 |
16.5 |
5.5* |
18 |
|
| CAER-DINEVAL |
19.5 |
12.5 |
13 |
31.5 |
16 |
4 |
17 |
21.5* |
34 |
|
| CAER-KONIG |
23.5 |
4 |
16.5 |
17 |
35.5 |
20 |
21 |
25.5* |
38 |
|
| DOUGAN'S HOLE |
20 |
17 |
12.5 |
4 |
32 |
16.5 |
21 |
22* |
34.5 |
|
| EASTHAVEN |
17.5 |
12.5 |
8.5 |
29.5 |
14 |
16.5 |
12.5 |
19.5* |
32 |
|
| GOOD MEAD |
16 |
13 |
8.5 |
28 |
12.5 |
17 |
4 |
18* |
30.5 |
|
| LONELYWOOD |
14.5 |
34 |
32 |
30.5 |
2.5 |
18 |
38 |
34.5 |
16.5* |
|
| TARGOS |
19.5 |
17.5 |
16 |
12 |
3.5 |
23.5 |
20 |
2* |
14.5 |
|
| TERMALAINE |
12 |
31.5 |
29.5 |
28 |
35.5 |
32 |
14* |
2.5 |
A few minor notes:
- * The path from Targos to Bremen has been snowed over, so
keep that in mind: difficult terrain, likely requires snow
shoes and longer travel times for that specific segment of the
journey. Basically, any NPC would recommend they have
show shoes.
- Termalain to Bryn Shander, if skipping Targos and going off road, should be 7 miles by road and 2.5 miles off road.
- Bryn Shander to Caer-Dineval, if off road, would be 15 miles.
- Bryn Shander to Dougan's Hole, if off road, would be 6 miles.
- Termalaine to Caer-Dineval, if off road, would be 12 miles.
- Termalaine to Caer-Konig, if off road, would be 13 miles.
So then the question becomes, is offroad travel worth the time for certain trips? It depends. Based on time alone, dog sled time is much faster, because I would guess that off road, dog sleds are 6 MPH. The random encounters may change the minds of some. The roads can be traversed at 3 MPH without show shoes, and 2 mph on show shoes (a requirement off road). Here is my guess:
- Bryn Shander to Caer-Dineval offroad is 15 miles, on road is 16 miles, so it is faster by the roads.
- Bryn Shander to Dougan's hole is 6 miles off road and 16.5
miles by road, so it is faster on road if by foot (5.5 hrs
versus 6 hrs snow shoes) but faster off road by dog sled (1 hr
versus 1.65 hrs).
- Termalaine to Caer-Dineval is 12 miles off road and 31.5
miles by road, so it is faster on road by foot (10 hrs versus
12 hrs snow shoes) but faster off road by dog sled (2 hrs
versus 3.15 hrs).
- Termalaine to Caer-Konig is 13 miles off road and 35.5 miles
by road, so it is faster on road by foot (11.7 hrs versus 13
hrs) or dog sled (2.1 hrs versus 3.55 hrs).
Then I decided I would also source the distances for chapter two, below.
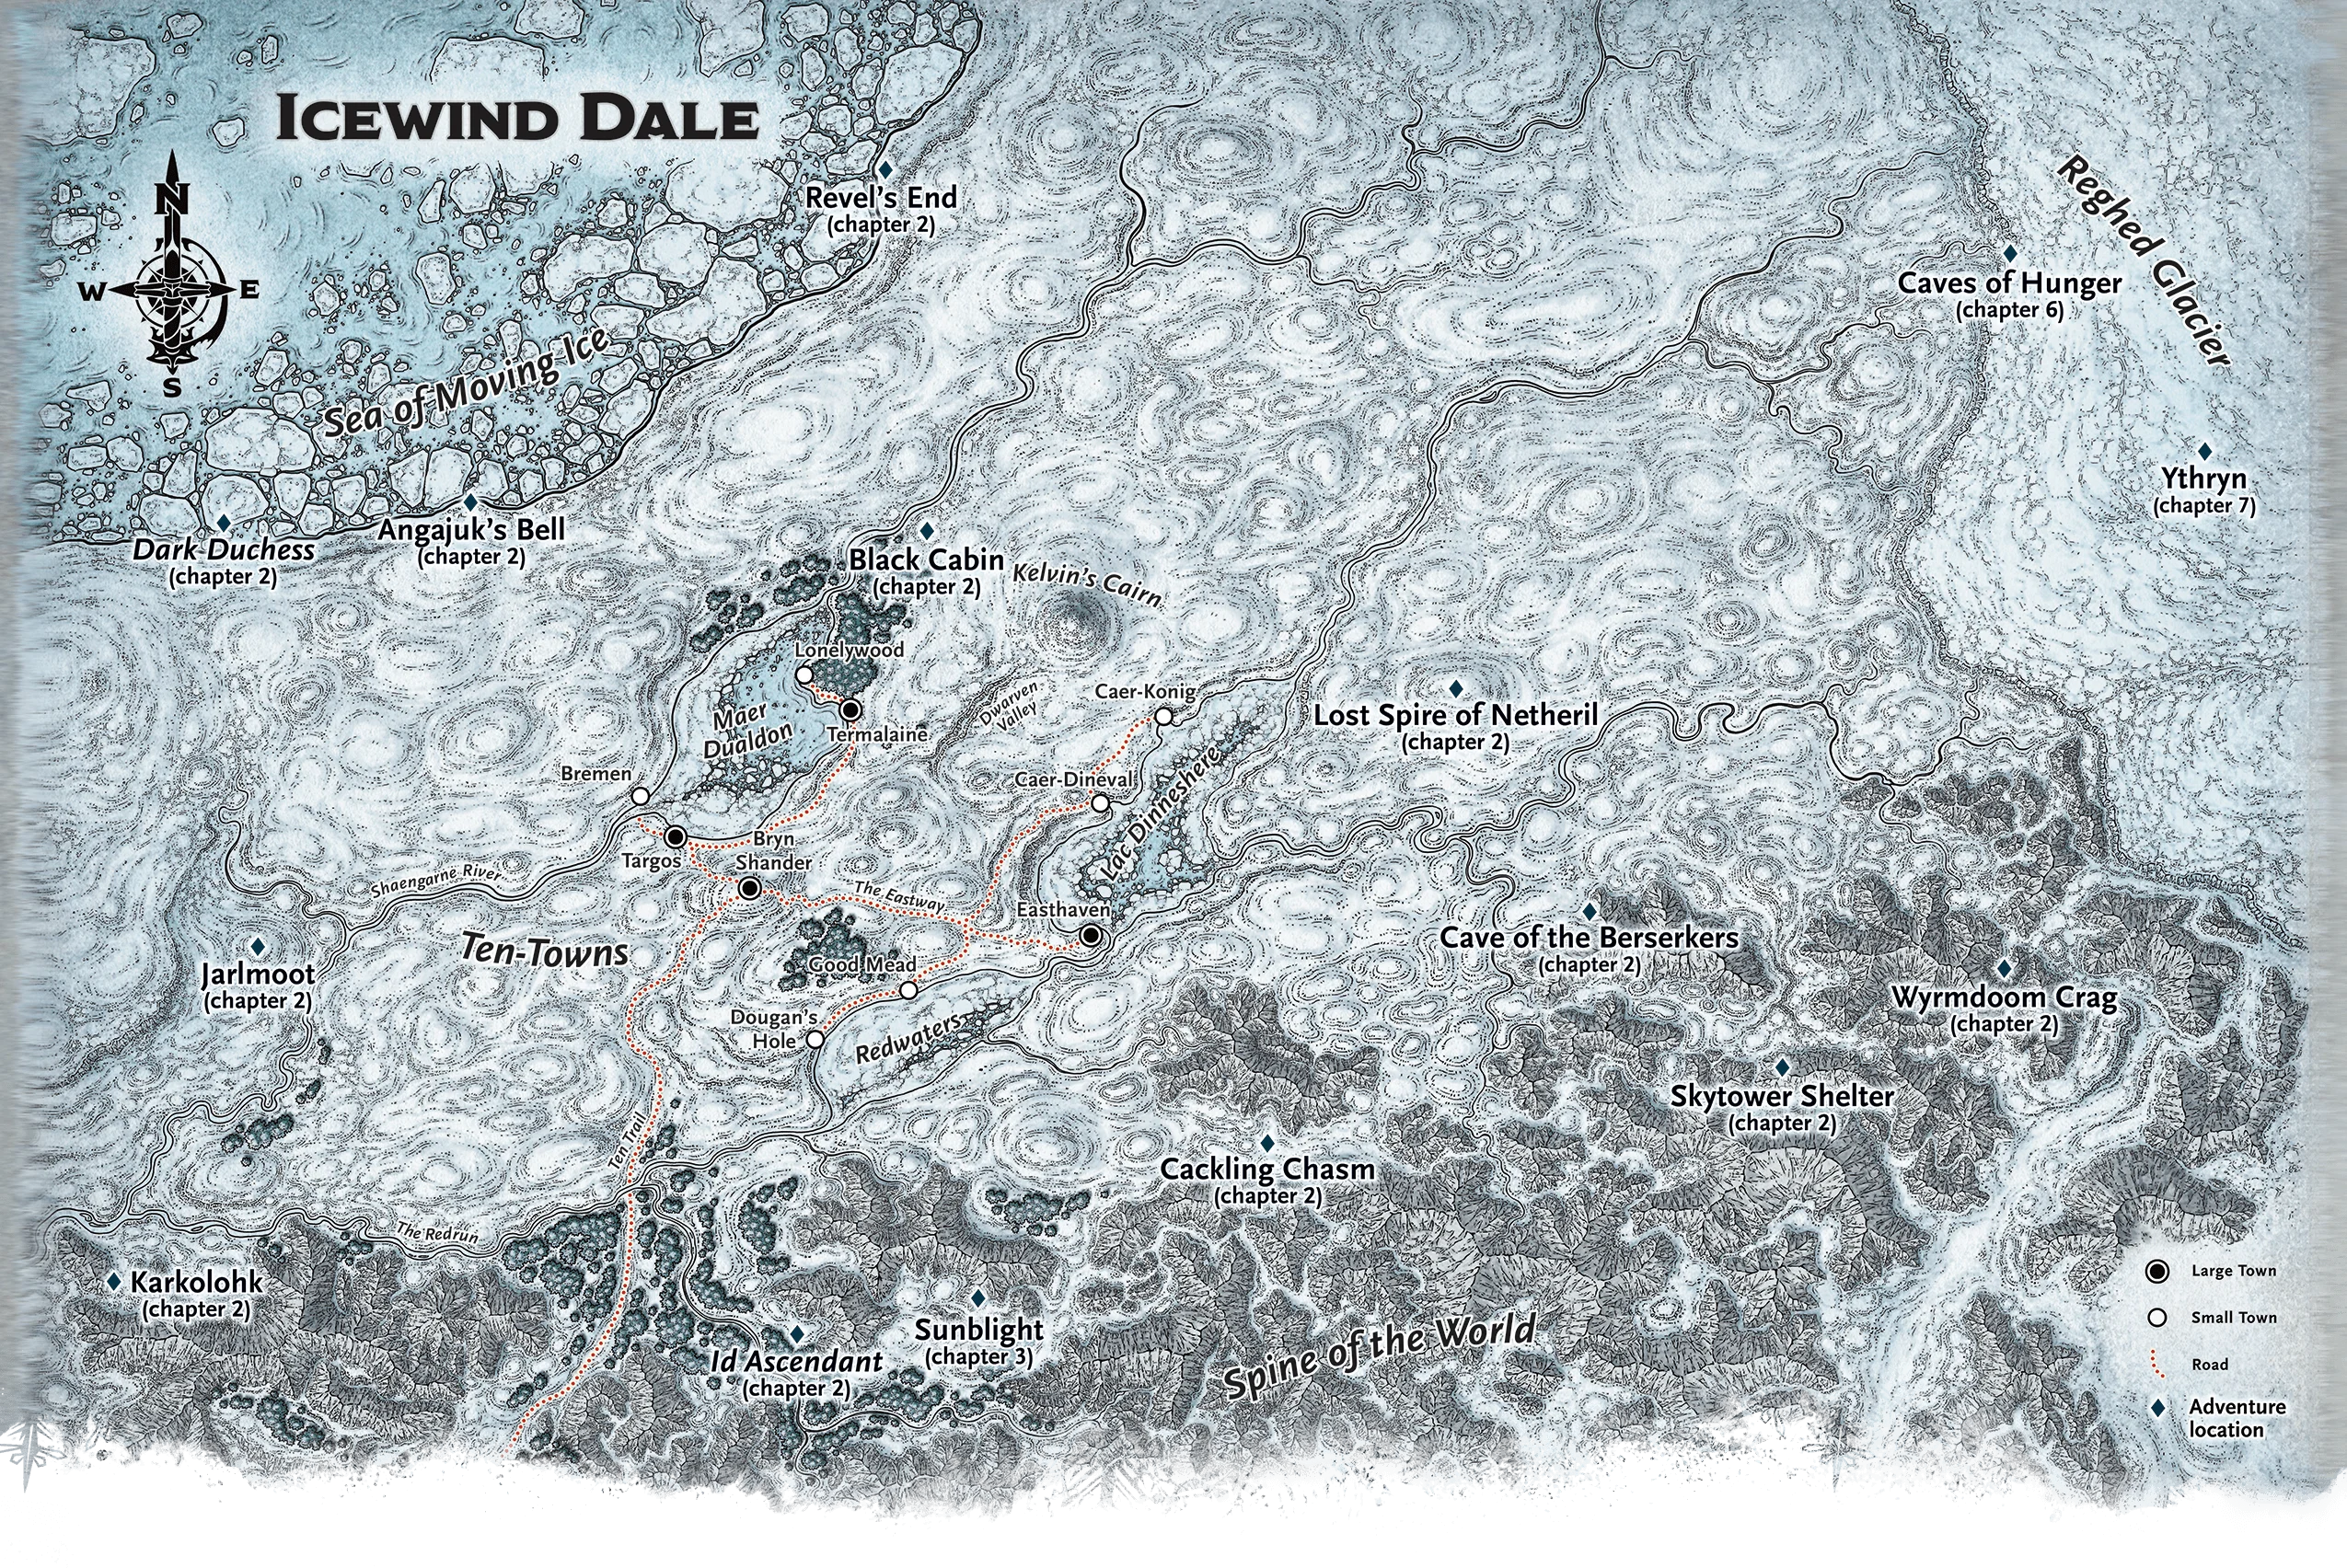
Icewind Dale Map Improvement (ch. 2)
The next day I thought to get mileage to and
from Icewind
Dale locations after chapter 1. Here's the chart I
came up with, using a ruler to map out comparative distances
using the previous chart from Ten Towns that I updated. At
the bottom of the table, I will include four entries from
various towns in Ten Towns to these locations. I will also
not include impractical travel distances (i.e. you would not
want to travel directly from Cackling Chasm to the Dark Duchess:
you would want to travel to Easthaven and take the roads out to
Bremen).
| RAW DISTANCES |
Angajuk's Bell |
Black Cabin |
Cackling Chasm |
Cave of Berserkers |
Dark Duchess |
Id Ascendant |
Jarlmoot |
Karkolohk |
Lost Spire of Netheril |
Revel's End |
Sky Tower Shelter |
Sunblight |
Wyrmdoom Crag |
| Angajuk's Bell |
19.5 |
8.5 |
21 |
35 |
21 |
||||||||
| Black Cabin |
19.5 |
22.5 |
14 |
||||||||||
| Cackling Chasm |
15.5 |
21 |
44.75 |
19.5 |
21 |
14 |
29.5 |
||||||
| Cave of the Berserkers |
15.5 |
36.4 |
58.8 |
9.75 |
36.4 |
9.75 |
28 |
16.75 |
|||||
| Dark Duchess |
8.5 |
28 |
30.8 |
29.5 |
|||||||||
| Id Ascendant |
21 |
36.4 |
28 |
7 |
|||||||||
| Jarlmoot |
21 |
14 |
|||||||||||
| Karkolohk |
35 |
44.75 |
58.8 |
30.8 |
28 |
14 |
|||||||
| Lost Spire of Netheril |
19.5 |
9.75 |
25.25 |
||||||||||
| Revel's End |
21 |
14 |
36.4 |
29.5 |
|||||||||
| Sky Tower Shelter |
21 |
9.75 |
8.5 |
||||||||||
| Sunblight |
14 |
28 |
7 |
||||||||||
| Wyrmdoom Crag |
29.5 |
16.75 |
25.25 |
8.5 |
|||||||||
| Bremen |
14 |
19.5 |
16.75 |
||||||||||
| Termalaine |
7 |
||||||||||||
| Dougan's Hole |
19.5 |
9.75 |
28 |
11.25 |
|||||||||
| Easthaven |
14 |
21 |
21 |
16.75 |
28 |
14 |
36 |
||||||
| Caer-Konig |
11.25 |
19.5 |
11.25 |
35 |
As well:
- Caer-Konig to the Caves of Hunger is 37.75 miles.
- The Lost Spire of Netheril to the Caves of Hunger is 28
miles.
Second Session
I found that it was best in the second session to sort of "steer" the party towards specific Ten Towns quests that will help them level up. My recommended order is Bremen, Brysn Shander, Caer-Dineval, Caer-Konig, Dougan's Hole, Easthaven, Good Mead, Loneliwood, Targos, and Termalain.
That being said, a year later I realized
that it's best to try not to let the party know you're steering
them. Provide rumors, foreshadowing, hooks and such.
And in session zero, especially, ask them if they prefer the
book's random roll or to go through the quests in an order which
will prevent total party kill (TPK). Basically, at the
beginning, give them the choice.
Third Session
This session, we tackled the White Moose quest. We had a total of seven playing. So I had to scale up some of the bad guys. I started by scaling up the White Moose HP and AC to that of a Tyrannosaurus Rex from the Monster's Manual. However, I felt like the HP was too high. I didn't scale up weapons, so it was still attacking them like a White Moose in terms of damage output. But even then, it packs a big punch, and the party lacked what I felt was a true tank (due to lack of +1/+2 armor, because I limited them to one +1 item, and they wisely chose weapons). Luckily they had healers. So maybe what I will do next time is not increase the White Moose so high. Indeed, I had been using the Kobold+ Fight Club calculator to scale things up a bit, but had accidentally counted myself and scaled for 8 x 3 level characters. But no worries. So what I learned is that 150 HP for the White Moose is probably too high for seven. Maybe it would be better if the White Moose was 125 HP for seven.
I also accidentally failed to remember that
the sarcophagus doors were shut and that
they had to figure out the moon dial riddle to open it. So
this led to them engaging Ravinson too soon. Thus the moon
dial riddle didn't really accomplish anything because they were
not forced to solve it. So I think instead of just writing
basic notes, I'm going to have to pay attention to things like
this. Ravinson was also at a very high level, as I had
scaled him to ArchDruid. This resulted in some characters
dying. Indeed, I transformed Ravinson into a Winter Wolf
and somehow lucked out in getting two frost breath weapon
recharges, so I nearly TPK'd. But this was again my fault,
as I scaled Ravinson a bit too high. That being said, some
characters did it to themselves, running from Ravinson rather
than taking disengage, so they ended up getting bitten as they
fled and died right there.
So what I learned: first, pay more attention
in RotFM to conditional things like doors. Second, try not
to scale the monsters too high. Indeed, I wonder if maybe
I should take more of a philosophy where I let them kill the
monster in 3 turns or so. Or I will have to literally know
the damage output of all my characters so that I can role-play
the scenarios so that the players struggle but don't die.
There's this "sweet spot" between easy and TPK. Also, I
learned something for my own quests: all quests should have at
least one puzzle to solve.